CorpoAlert helps you track expiries, manage compliance, and receive automated alerts from a single dashboard. Set up your assets once, and let our system handle reminders, notifications, and reporting so you never miss a critical deadline.
To get started with CorpoAlert, users must first create an account. The registration process is simple, secure, and designed to help you start managing your assets and compliance without any hassle.
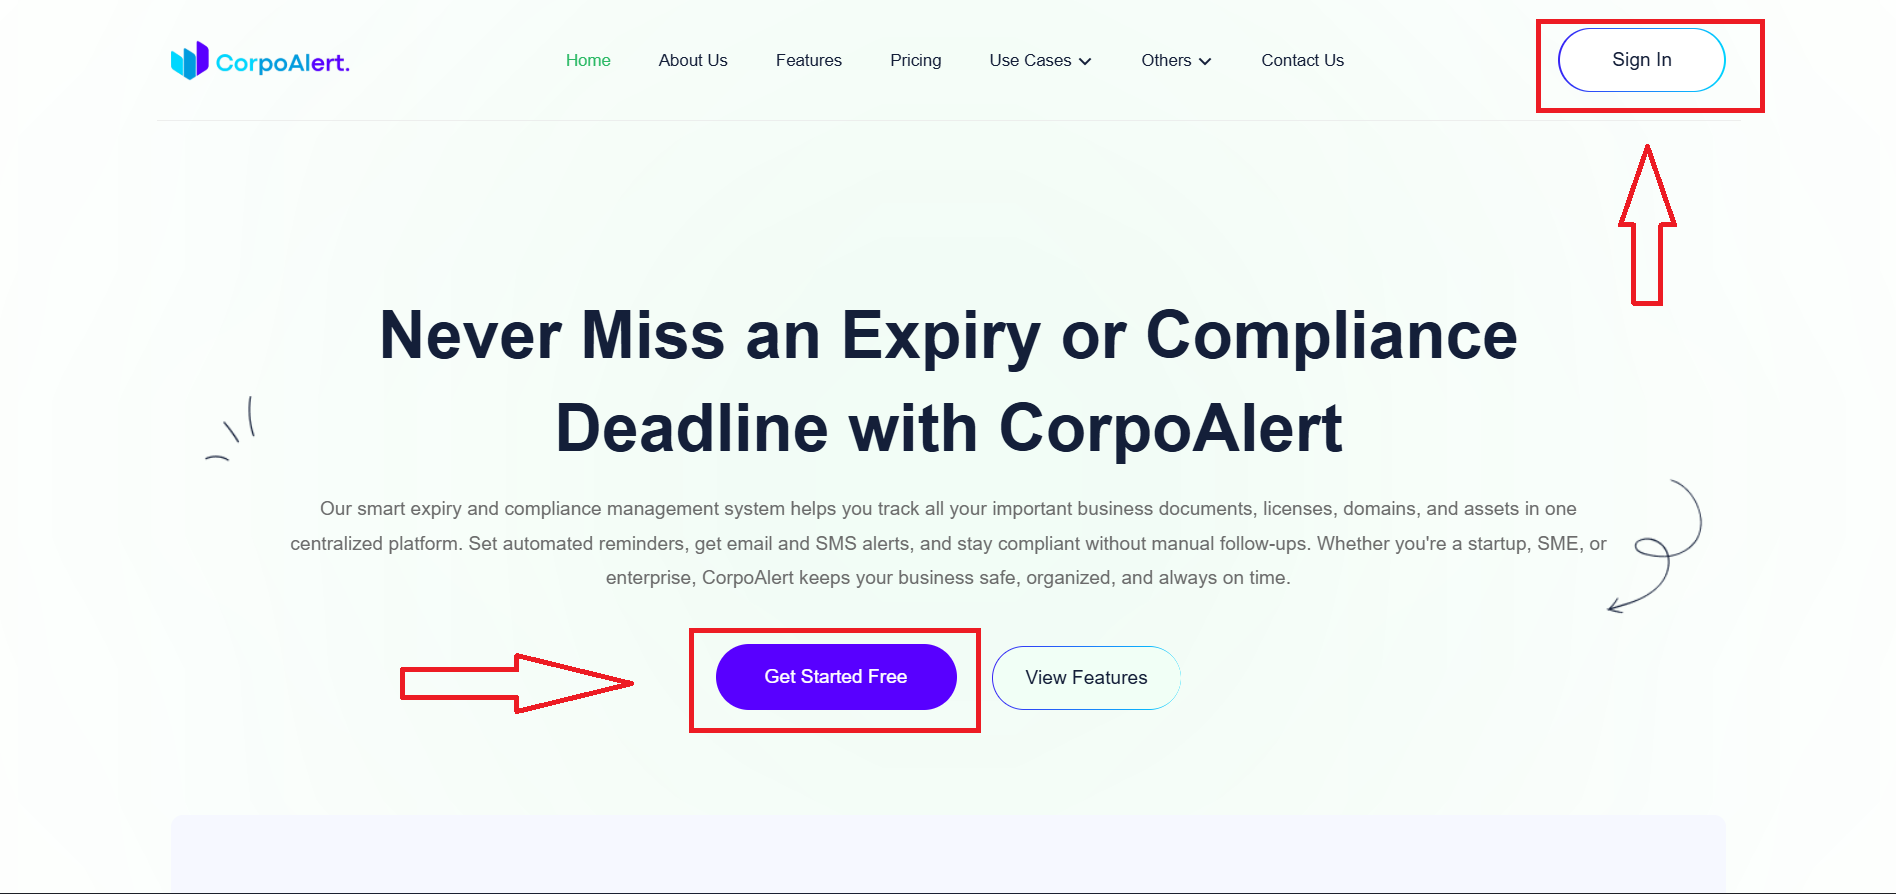
First, visit the official website: https://corpoalert.com. From here, you can begin the registration process using either the header menu or the homepage banner.
 Click the Sign In button from the website header to open the
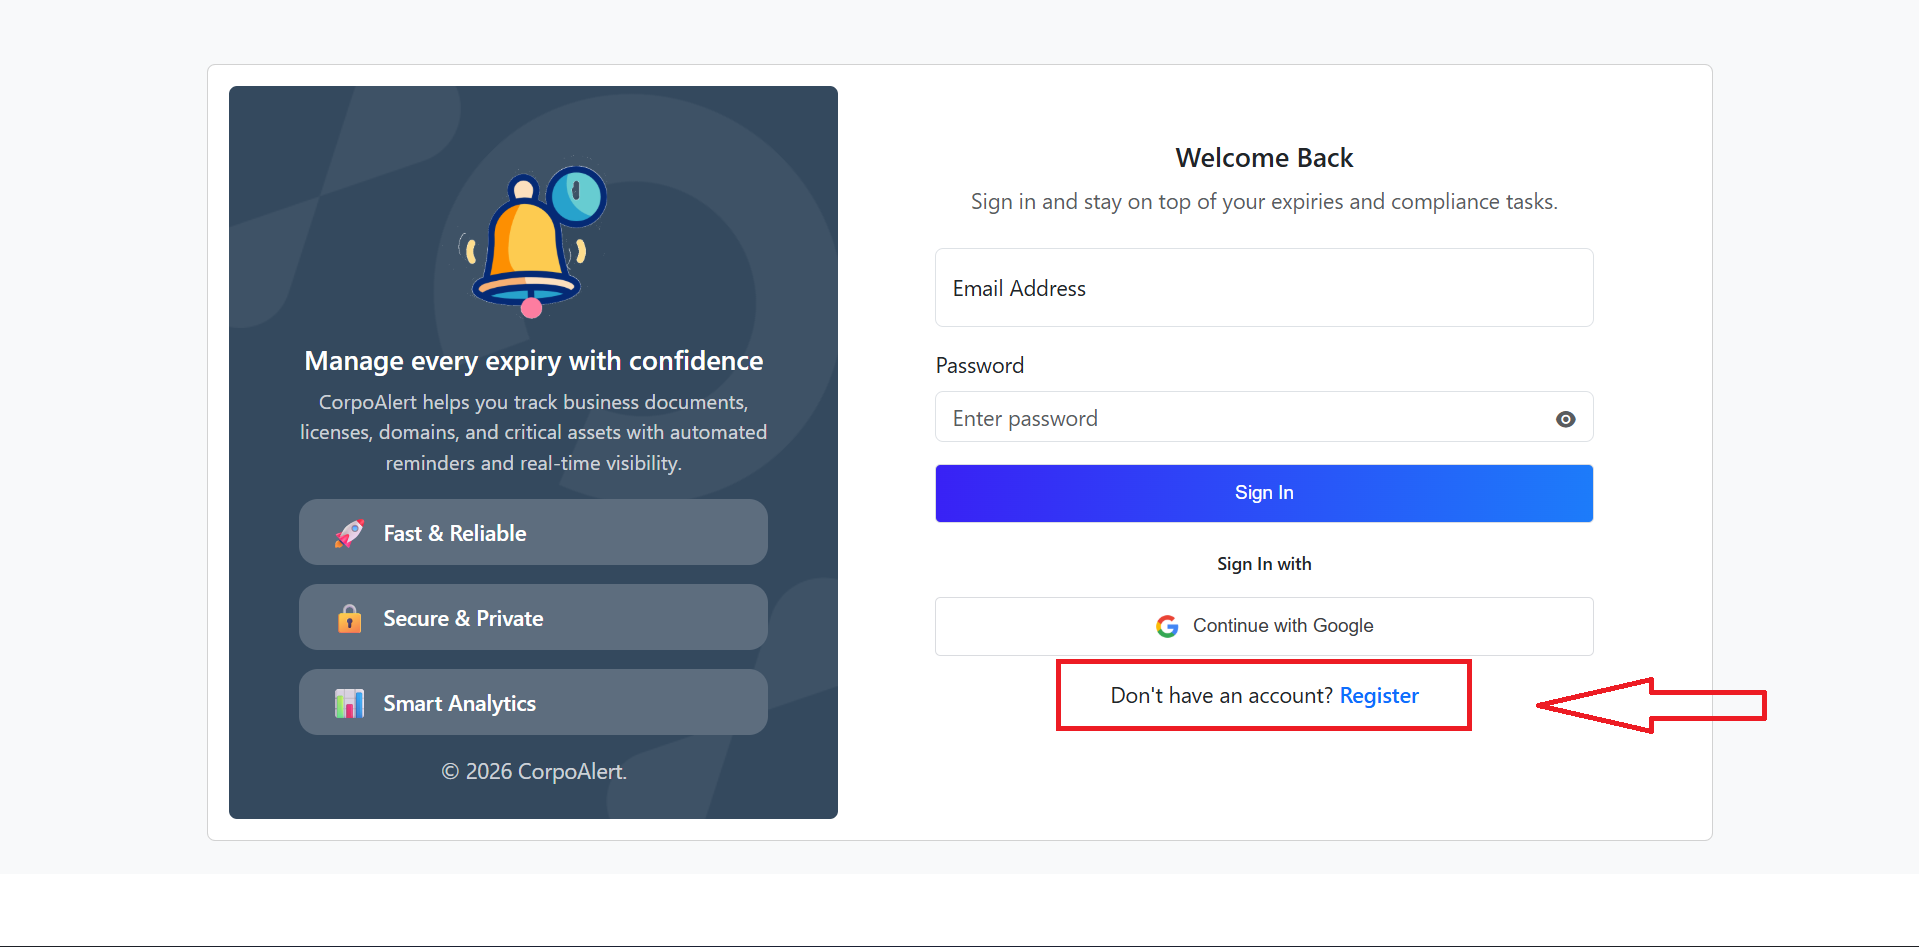
Login page. On the login screen, you will find a
New User / Create Account link that redirects you to the
registration page.
Alternatively, click the Get Started for Free button from the
homepage banner to be redirected directly to the Register page.
Both options lead to the same secure registration form, where you can
create your CorpoAlert account and begin the onboarding process.
Once registered, you will be guided through
email verification, password setup, plan selection, and
company configuration.
Click the Sign In button from the website header to open the
Login page. On the login screen, you will find a
New User / Create Account link that redirects you to the
registration page.
Alternatively, click the Get Started for Free button from the
homepage banner to be redirected directly to the Register page.
Both options lead to the same secure registration form, where you can
create your CorpoAlert account and begin the onboarding process.
Once registered, you will be guided through
email verification, password setup, plan selection, and
company configuration.
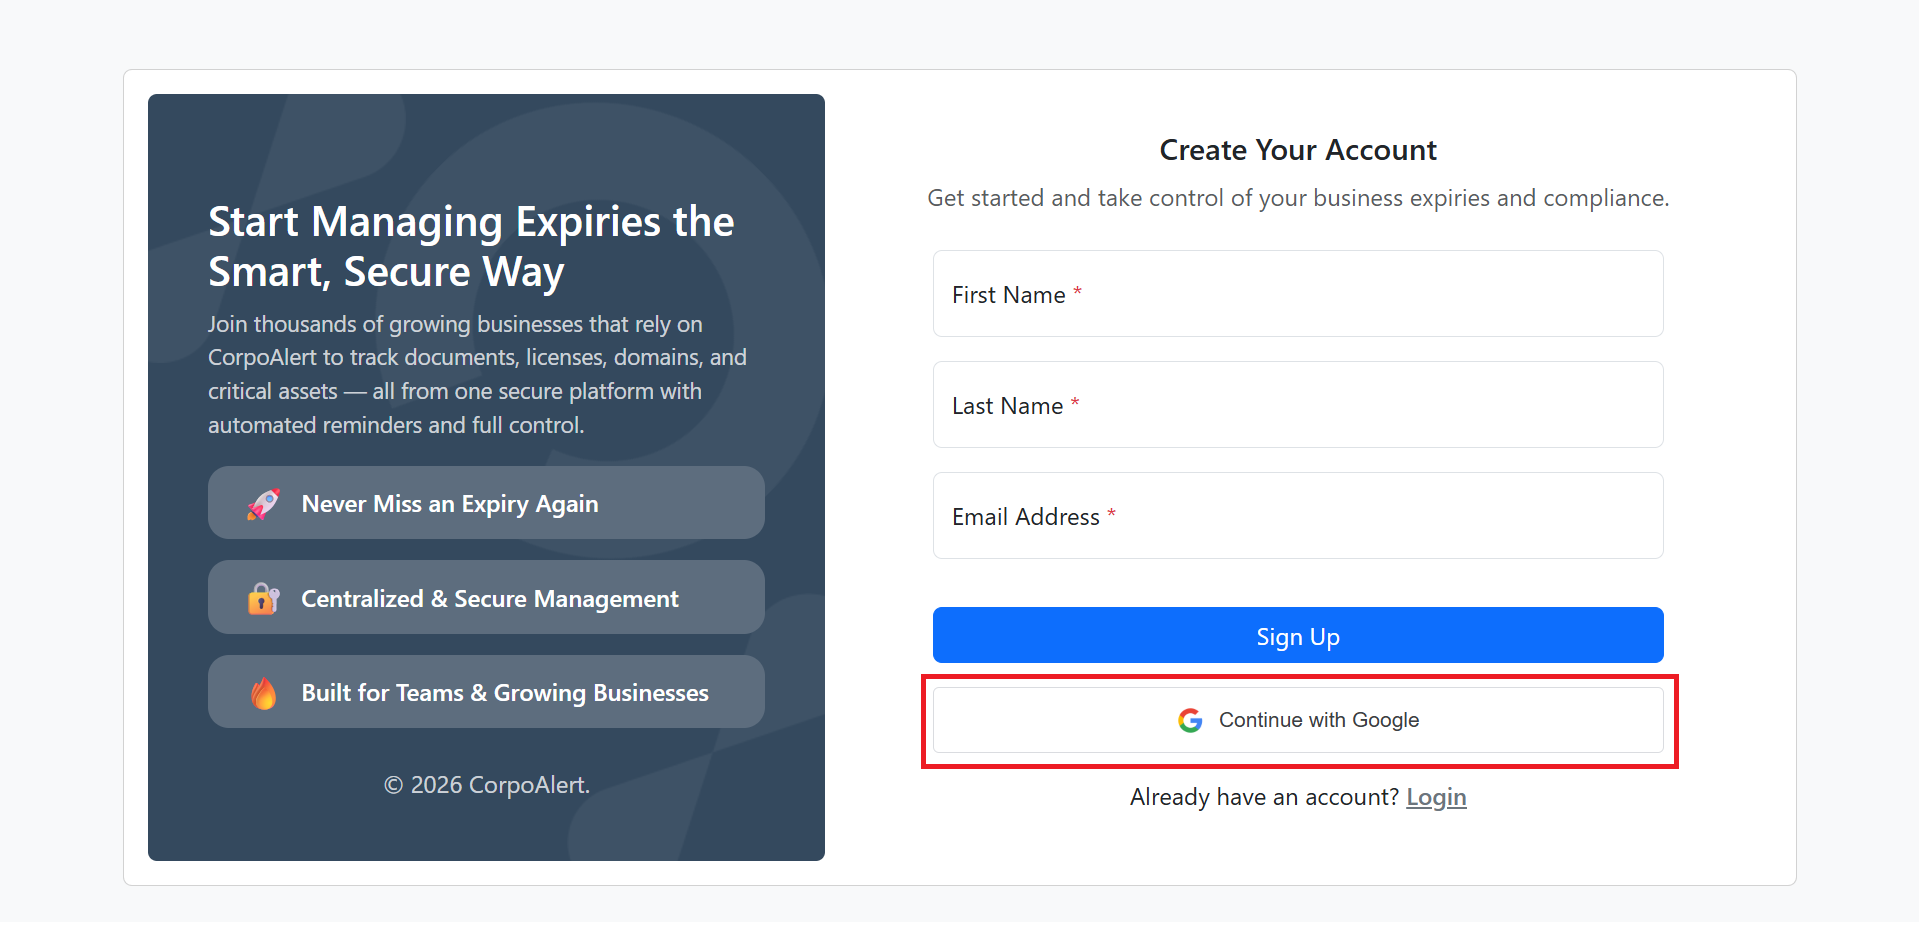
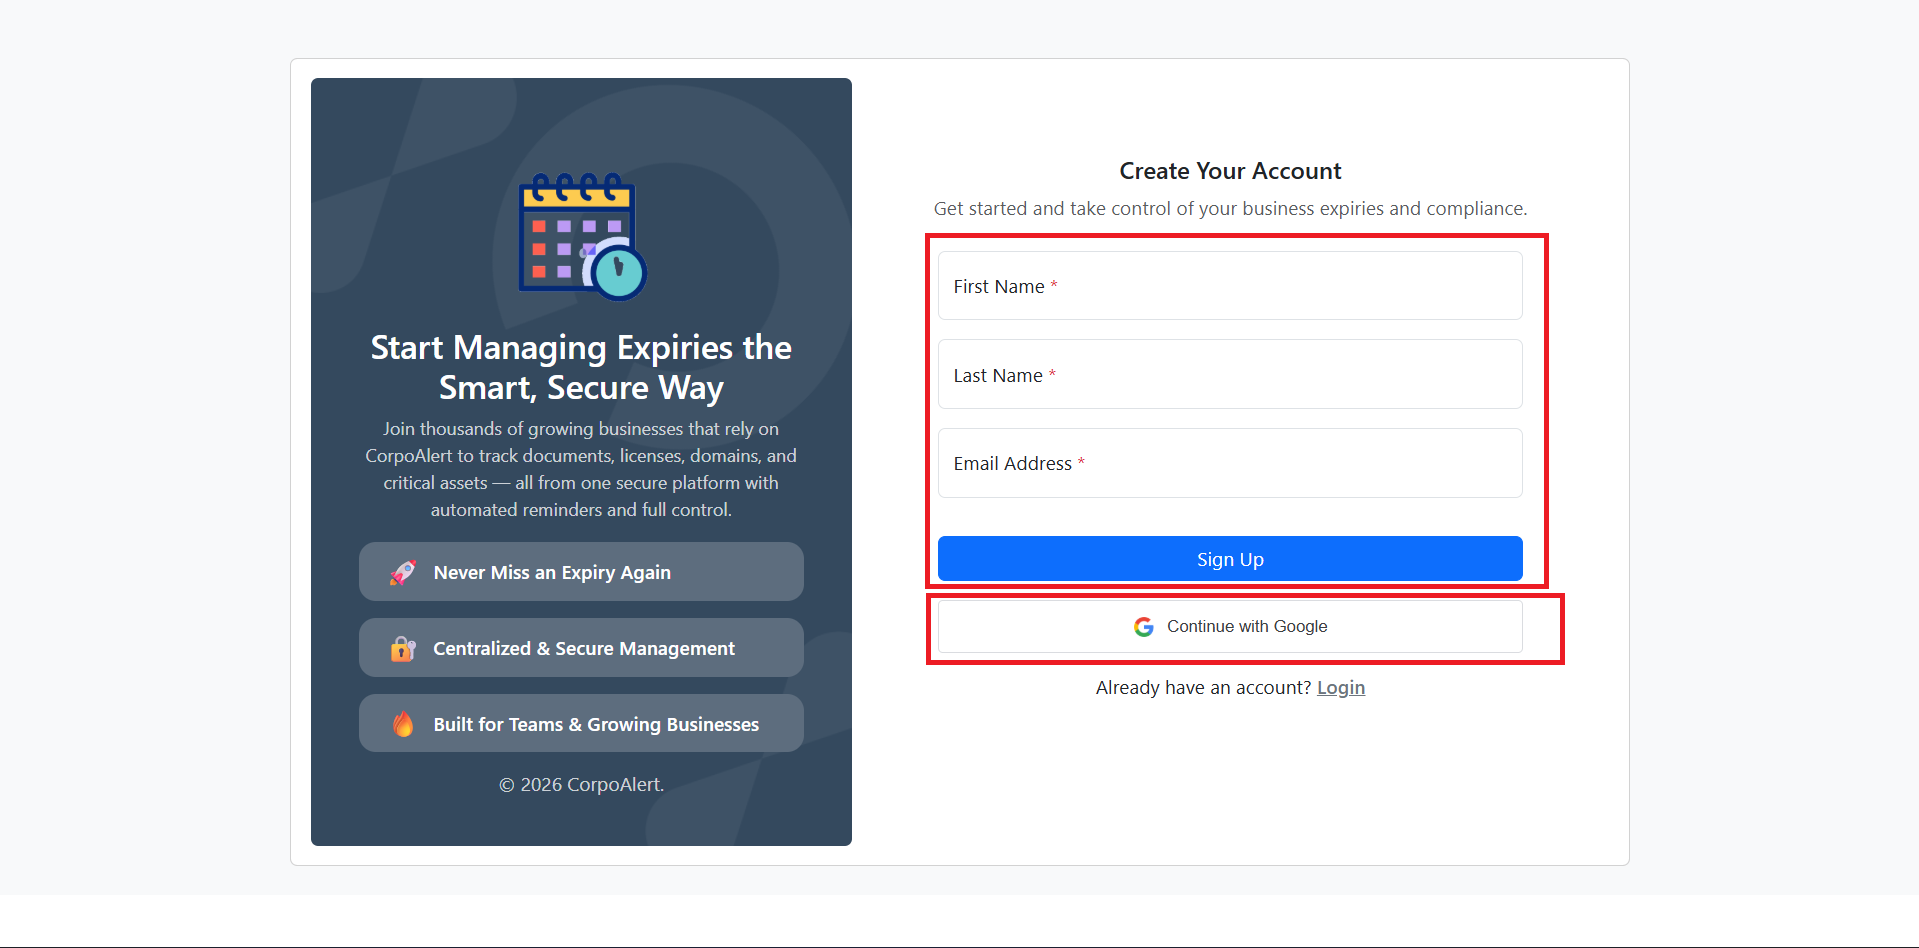
When you land on the Register Page, you will see two options to create your account:
Option 1 - Manual Registration: Fill in your First Name
(required, 3-100 characters), Last Name (required, 3-50 characters), and a valid Email Address.
Click the Register button. The system will automatically validate your data.
If all information is correct, your data will be stored and a verification email will be sent to your provided email address for confirmation.
If there are any validation errors, a toast message will inform you about the specific issues so you can correct them.
Option 2 - Register with Google: Click the Google Sign Up button.
Your account will be created automatically. The system will also handle:
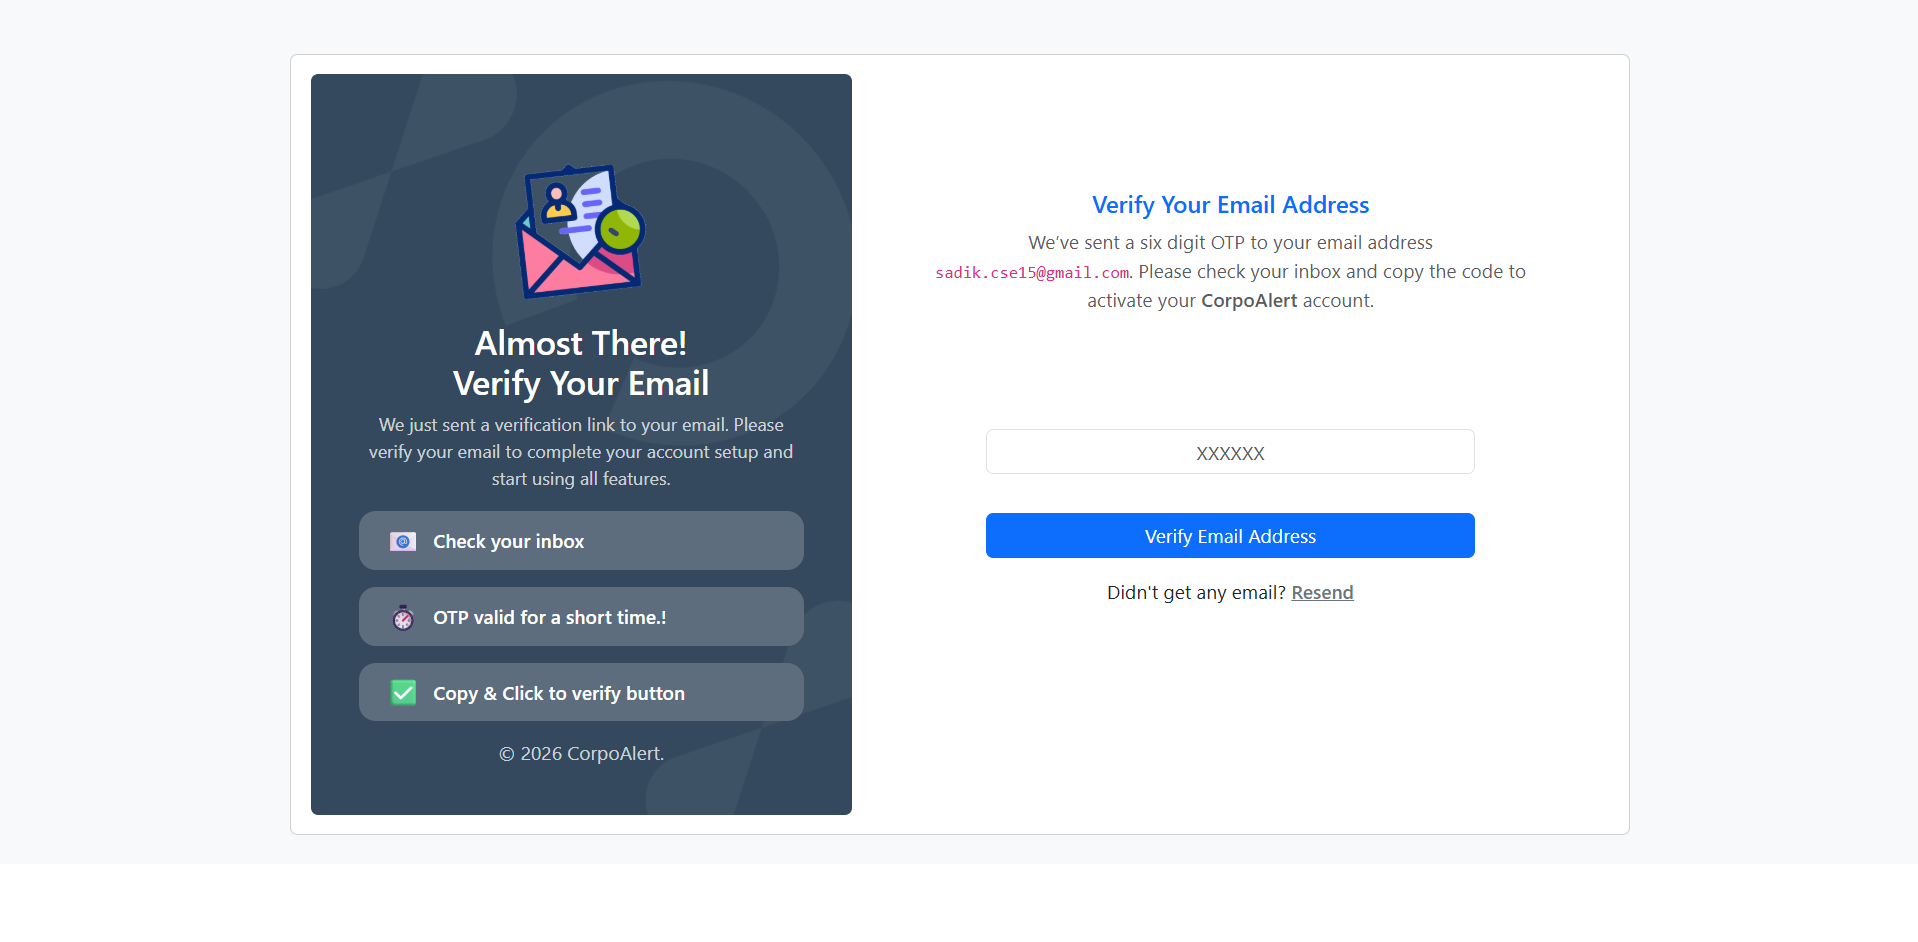
After completing the Create Account step, the system sends a 6-digit OTP to the email address you provided. Follow these steps to verify your account:
Check your email inbox for the 6-digit OTP sent by CorpoAlert.
If you do not receive the email, check the spam/junk folder or the
Check Email Status option on the page.
Copy the OTP and paste it into the OTP field on the Verify Email page.
Click the Validate Email button. The system will check your OTP automatically.
OTP Validity: Each OTP is valid for 5 minutes only.
If 5 minutes pass, the OTP will expire.
If the OTP expires, click the Resend OTP link to get a new email.
You can resend the OTP up to 3 times. After the third attempt,
the resend button will be disabled.
If you cannot receive the OTP after multiple attempts, please contact us using the
Contact Page to get assistance.
When the OTP is correct, your account will be successfully verified
and you will be redirected to the Set Password page.
If the OTP is incorrect or expired, a toast message will explain
the reason so you can take the correct action.
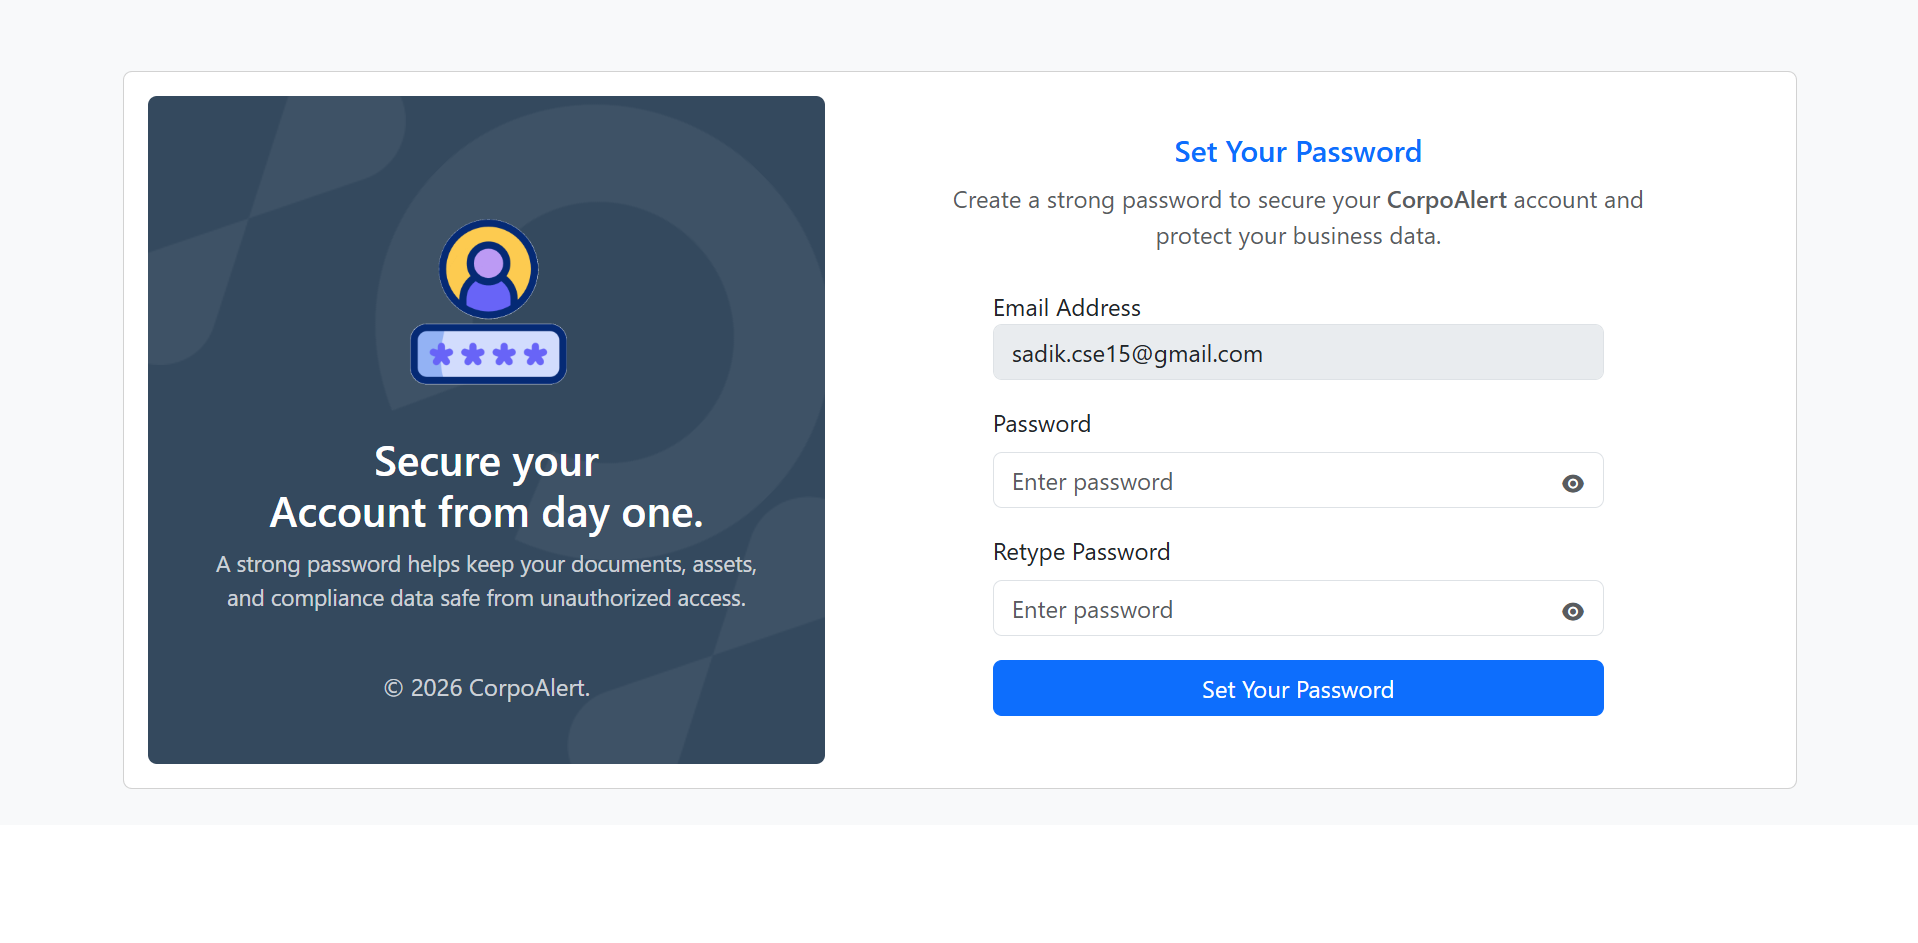
After your email is successfully verified, you will be redirected to the Set Password page. Follow these steps to create a strong and secure password:
Your Email Address will be displayed at the top.
This cannot be changed at this stage.
Enter your desired password in the Password field and repeat it in the
Confirm Password field.
Your password must meet the following requirements:
Click the Set Password button. The system will validate your password automatically.
If the password meets all the criteria, it will be saved and your account setup will be complete.
If there are any errors (e.g., password too short, missing uppercase, or mismatch), a
toast message will display the specific issue.
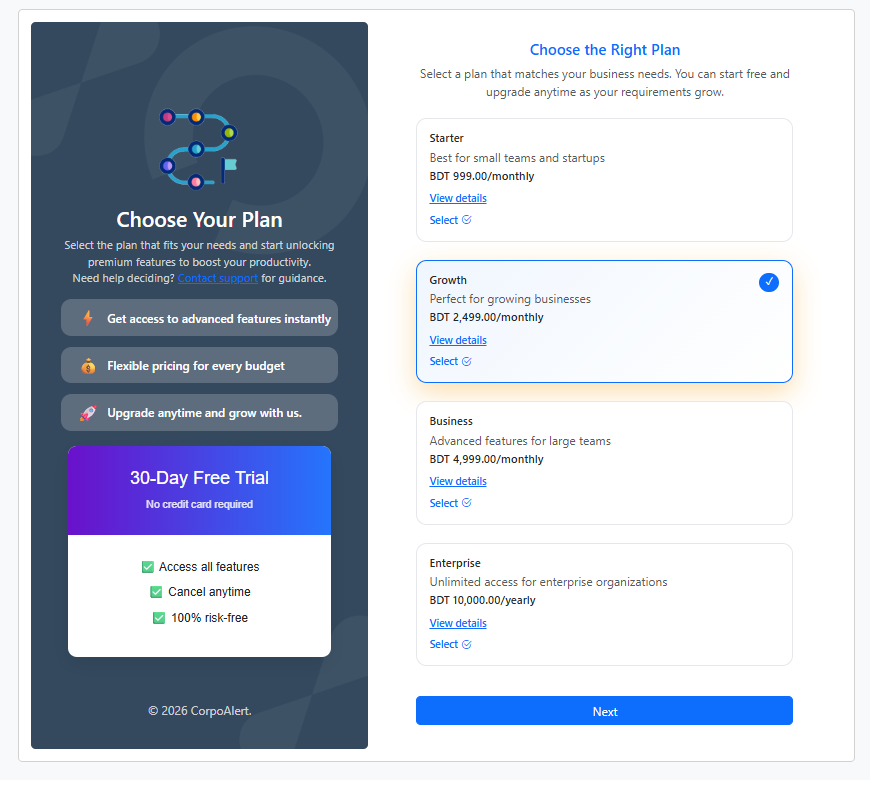
After successfully setting your password, the next step is to choose a subscription plan. Currently, you can enjoy 30 days of free usage without providing any credit card information. Follow the steps below to select the plan that suits your business needs:
On the right side of the page, you will see all available plans.
Click the View Details link to explore the features and benefits of each plan.
Once you have selected your preferred plan, click the Set Plan button to confirm your subscription.
After setting your plan, you can proceed to the final step: Company Setup.

Congratulations! 🎉 You have successfully completed your account creation and plan selection. The final step is to set up your company. Once this is done, you will be redirected to your Dashboard.
Fill in the Company Setup Form with the following information:
After filling the form, click the Finish button.
The system will automatically validate your input:
This section handles all login-related functionalities for users. It contains the following options:
Login Process – Allows registered users to log in using their email and password.
Forget Password – Users can reset their password in case they forget it.
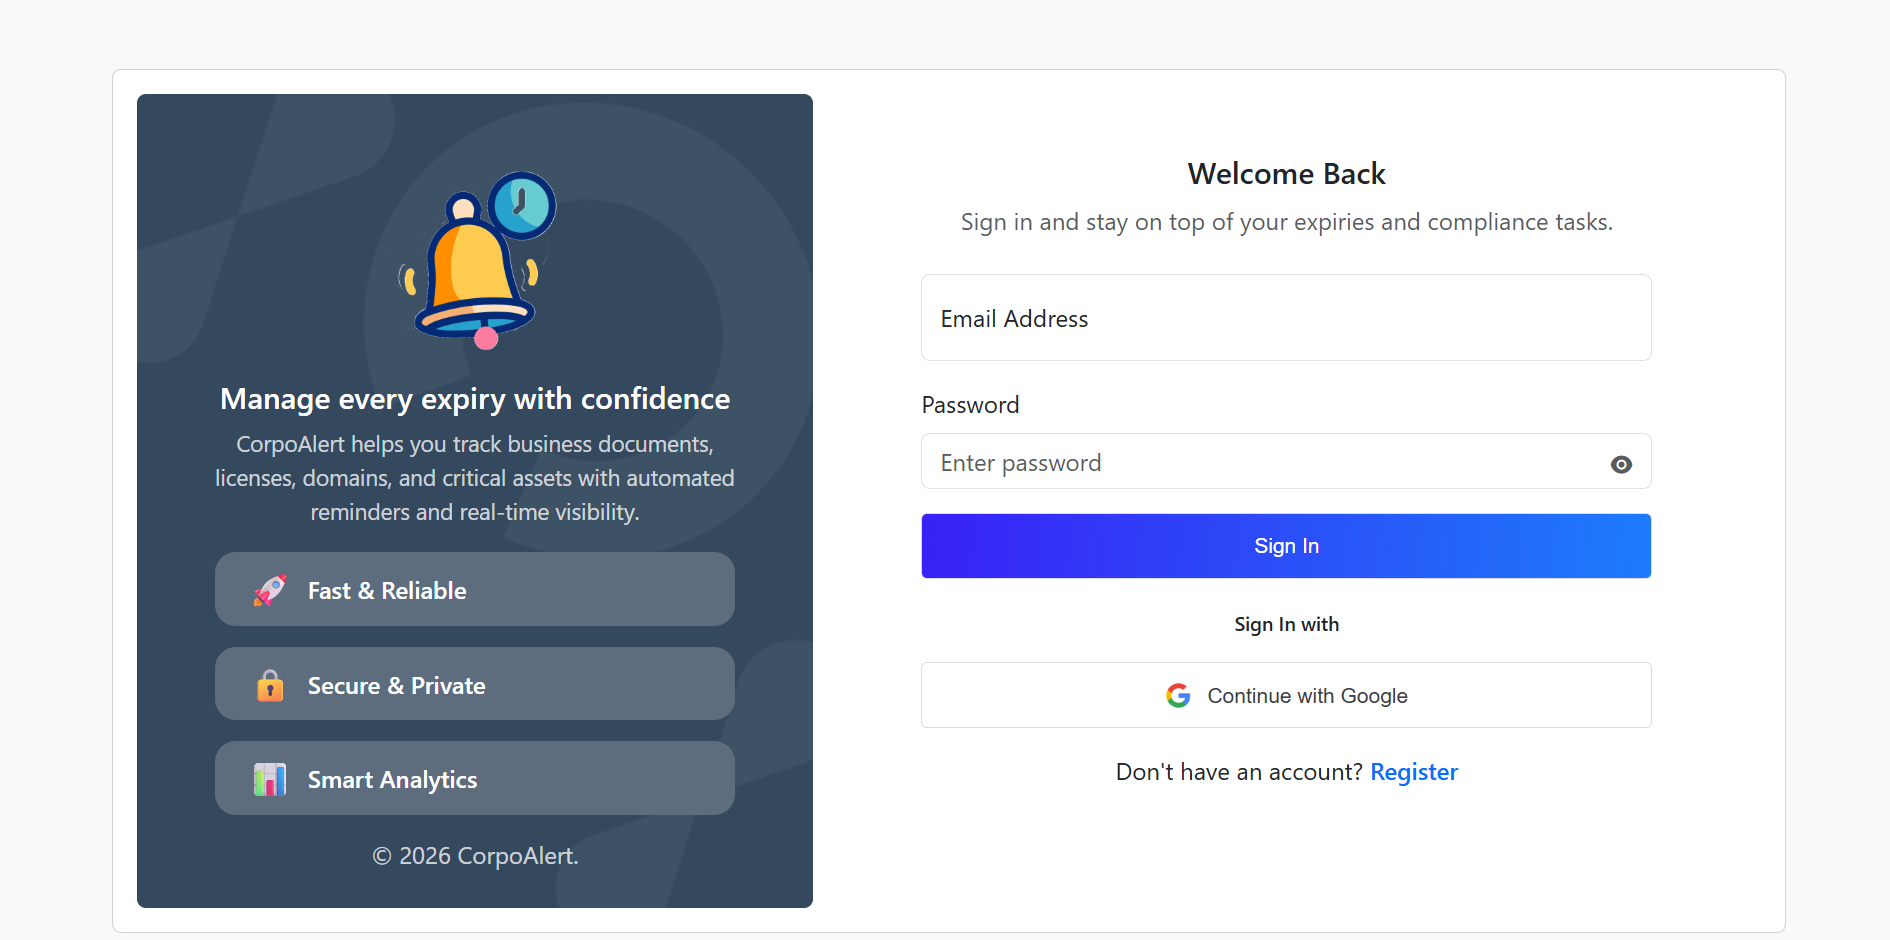
Users can log in to the system using two available methods. Follow the steps below for a smooth login experience:
Option 1: Manual Login – Enter your registered email and password in the login form and click the Sign In button.
Option 2: Google Login – Click the Continue with Google button to authenticate via your Google account.
Forgot Password? – If you forget your password, click the Forget Password link to reset it.
New User? – If you don’t have an account, click the Register link to create a new account.
Validation:
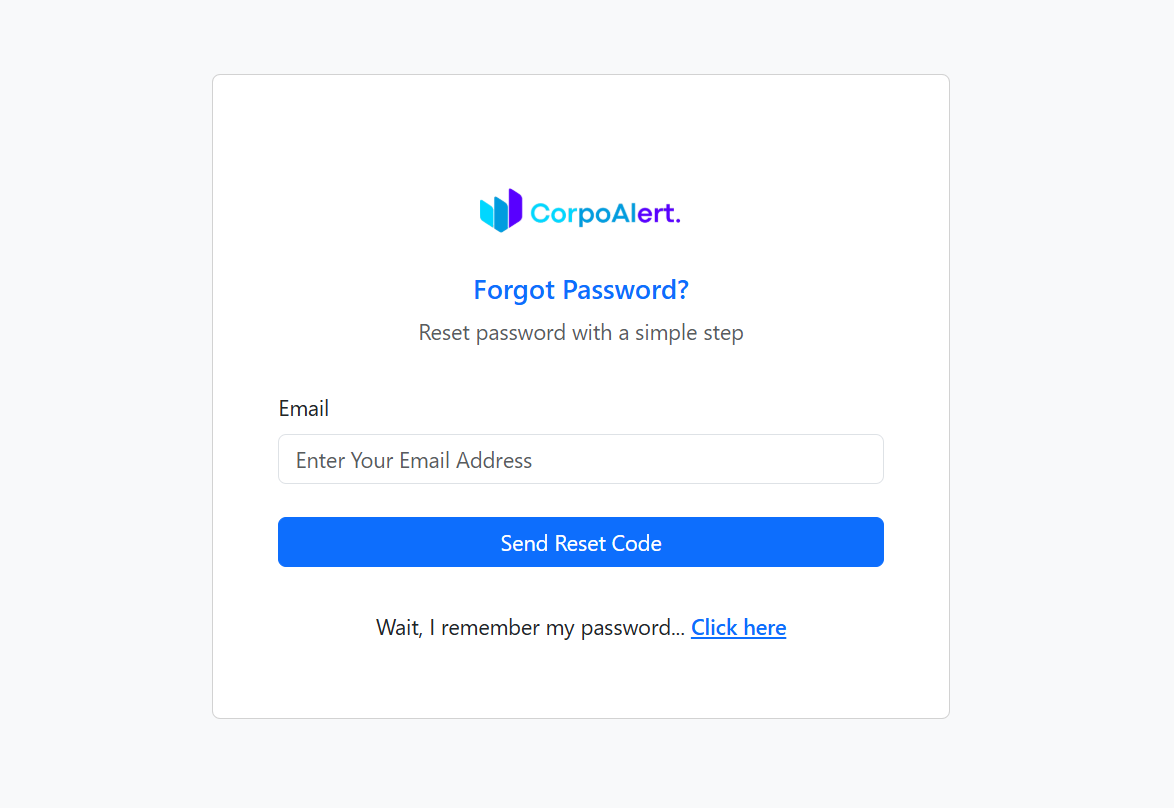
If you forget your password, follow this 3-step process to securely reset it and regain access to your account:
Enter your registered email address in the Forget Password form. If the email exists in our system, a 6-digit OTP will be sent to your email address for verification.
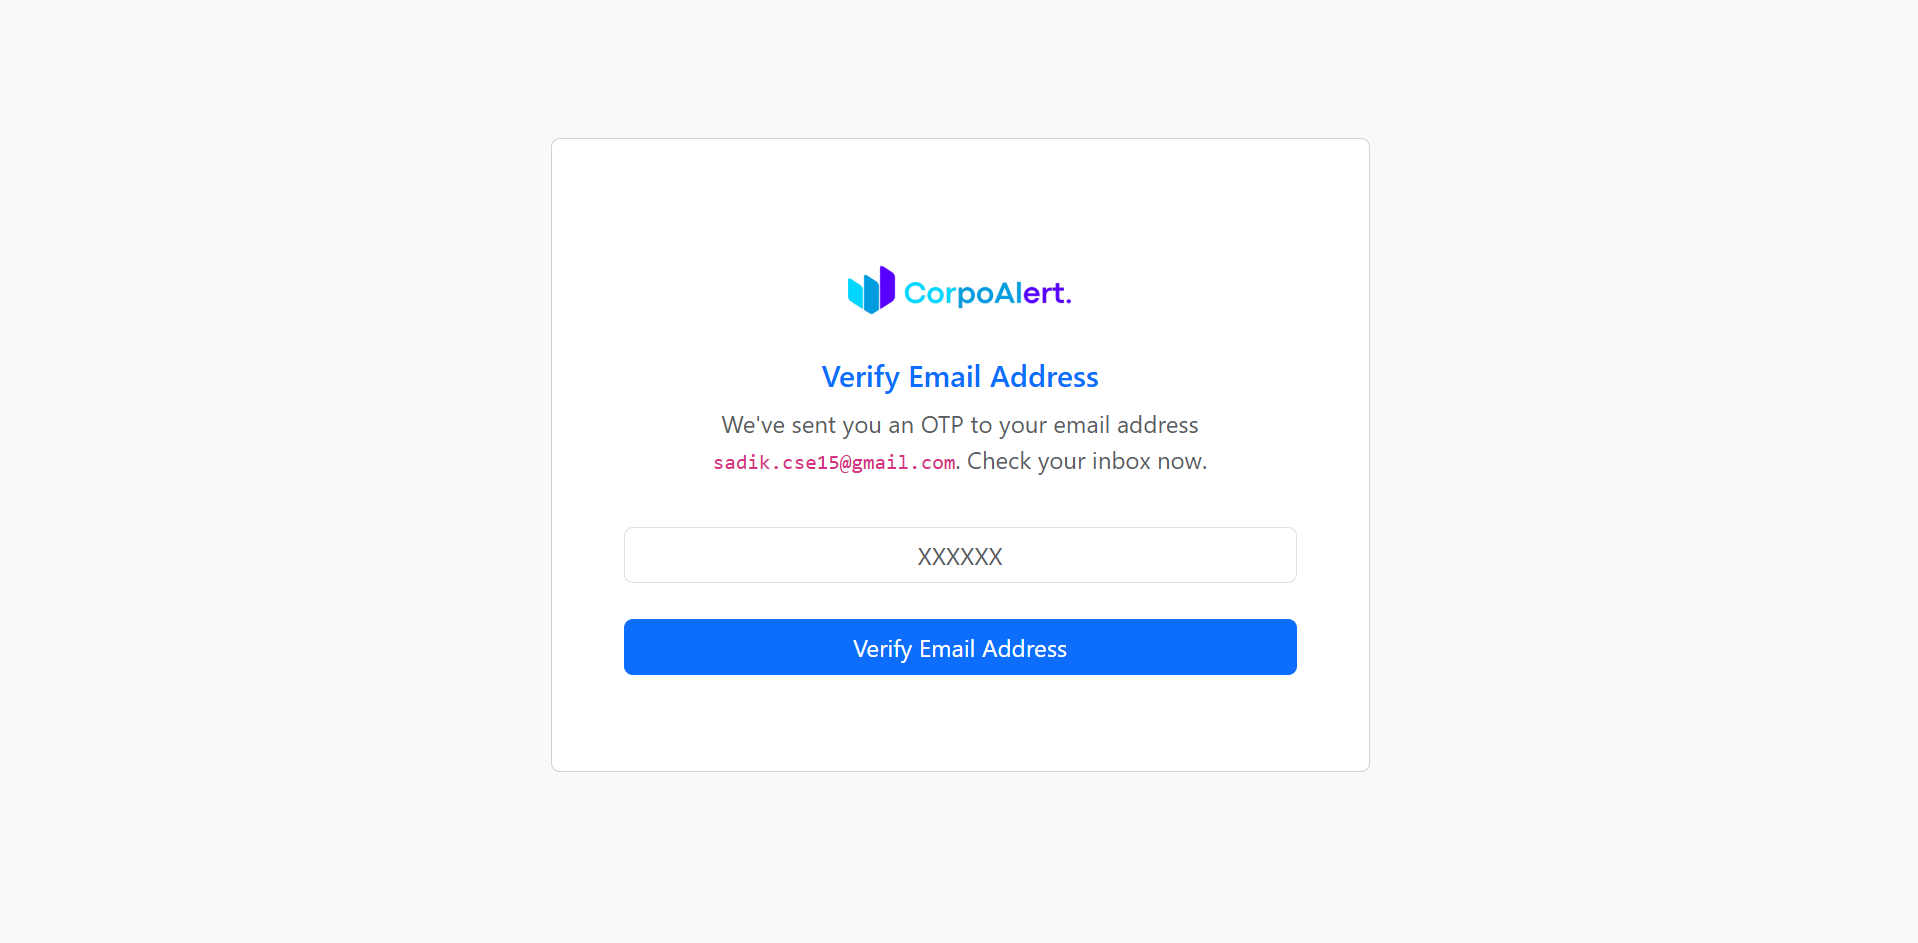
Enter the OTP sent to your email address in the verification field and click Validate OTP. If the OTP is correct, you will be allowed to proceed to the password reset page. If the OTP is invalid or expired, a toast message will notify you.
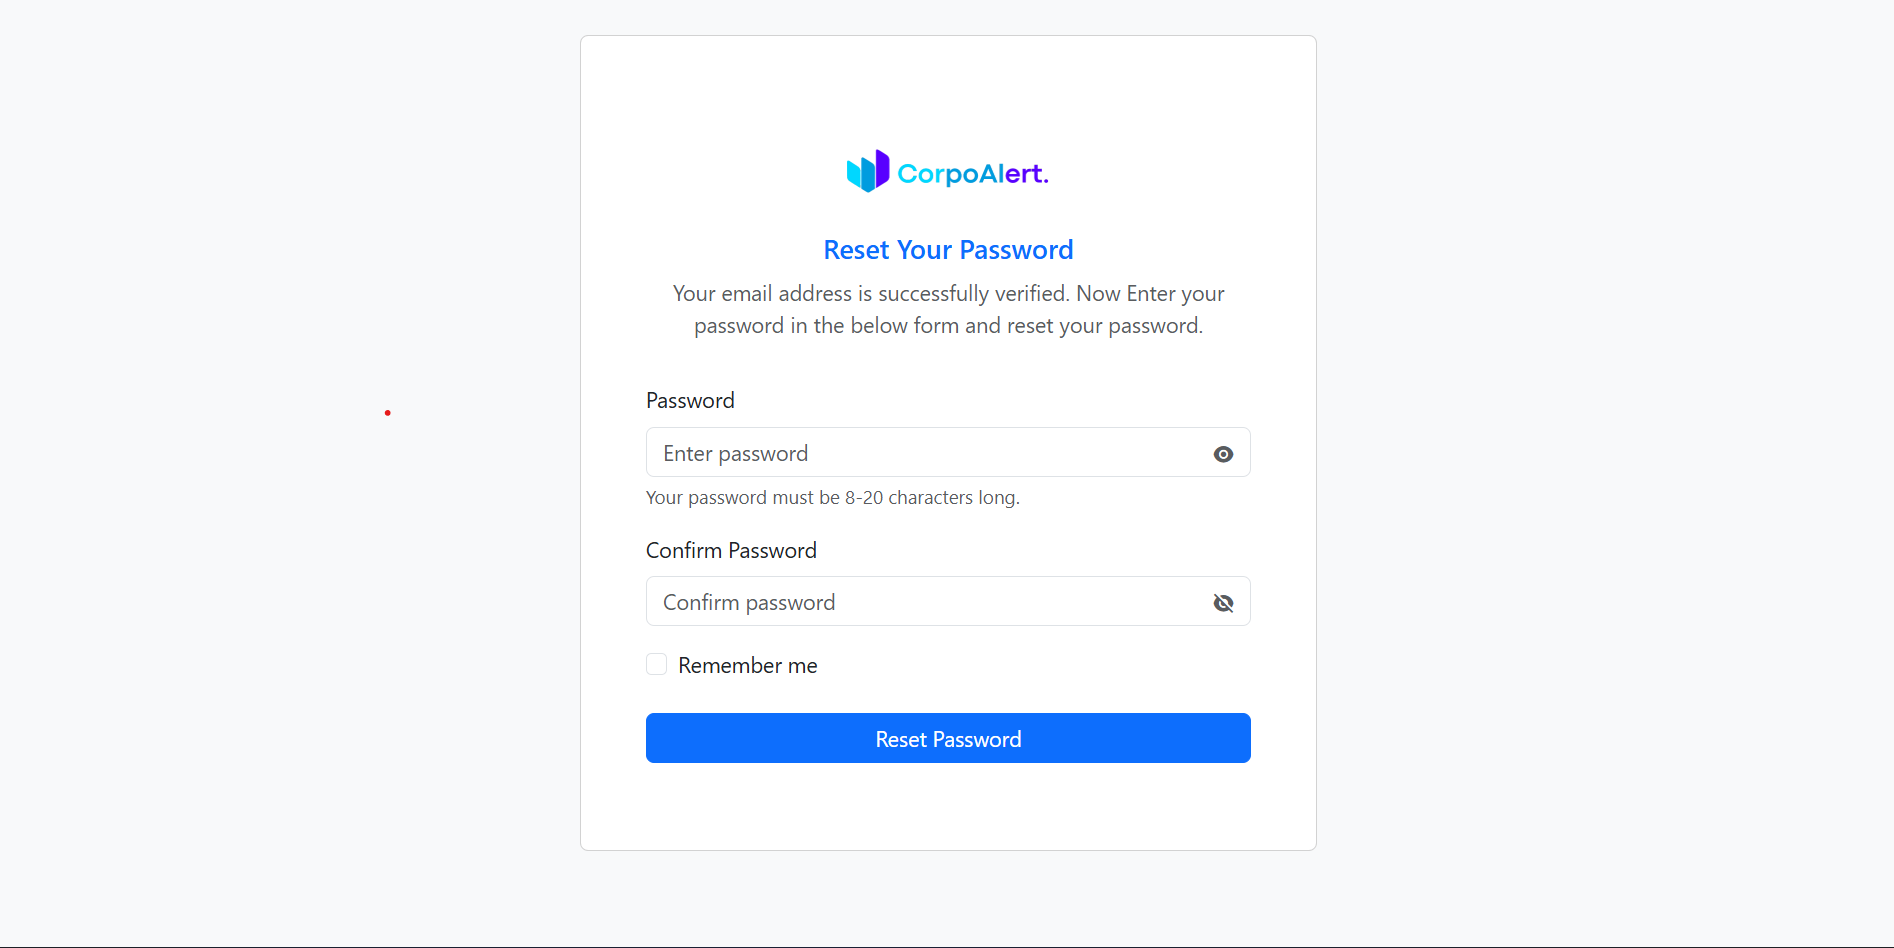
On the password reset page, enter your new password and confirm it. The password rules are:
After setting your password correctly, click Reset Password to update your account. You will then be able to log in with your new password.
The Dashboard provides a quick and clear overview of your entire system. From here, you can instantly monitor assets, companies, sellers, and reminders without navigating through multiple pages.
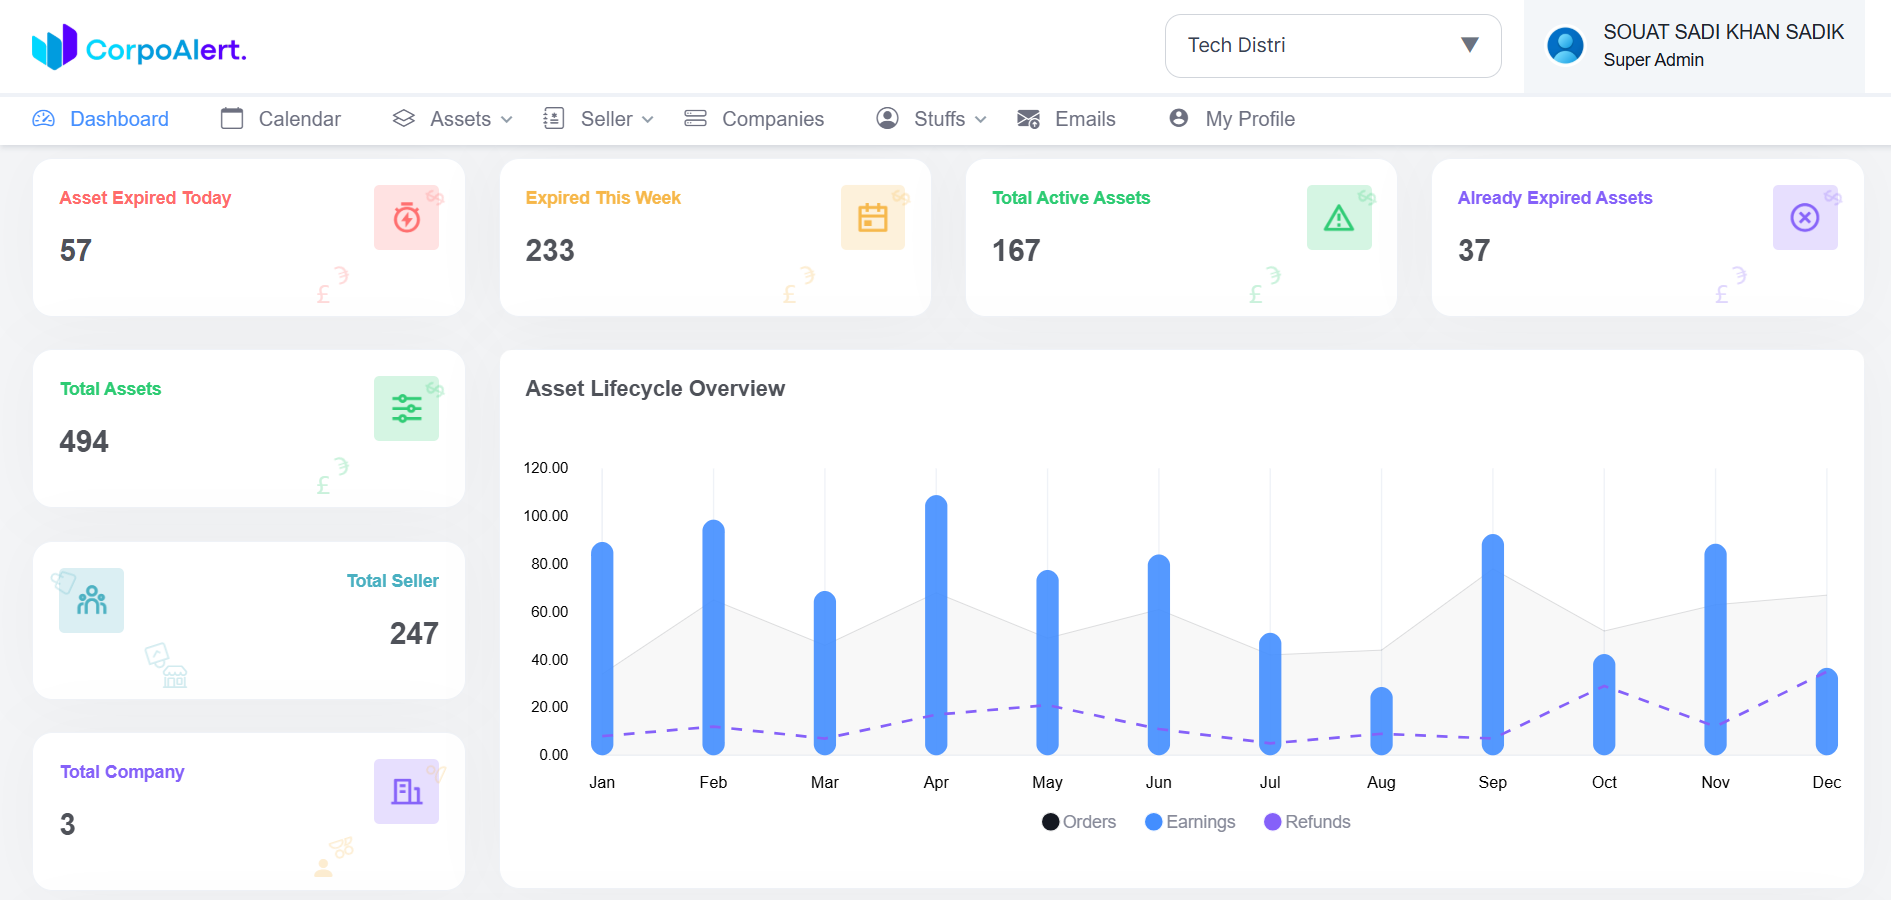 Selected Company – Displays the currently active company you are working with.
Expired Asset Today – Shows assets that expire today and require immediate attention.
Expired This Week – Lists assets that will expire within the current week.
Active Assets – Displays all currently active and valid assets.
Already Expired – Shows assets that have already crossed their expiry date.
Total Asset – Total number of assets available in the system.
Total Seller – Total sellers associated with the selected company.
Total Company – Total companies accessible to the logged-in user.
Asset Lifecycle Overview – Visual summary of asset status and lifecycle stages.
Upcoming Reminder – Notifications for assets that will expire soon.
Expired Reminder – Alerts for assets that have already expired.
Selected Company – Displays the currently active company you are working with.
Expired Asset Today – Shows assets that expire today and require immediate attention.
Expired This Week – Lists assets that will expire within the current week.
Active Assets – Displays all currently active and valid assets.
Already Expired – Shows assets that have already crossed their expiry date.
Total Asset – Total number of assets available in the system.
Total Seller – Total sellers associated with the selected company.
Total Company – Total companies accessible to the logged-in user.
Asset Lifecycle Overview – Visual summary of asset status and lifecycle stages.
Upcoming Reminder – Notifications for assets that will expire soon.
Expired Reminder – Alerts for assets that have already expired.
The Selected Company feature allows you to control which company’s data you are currently working with. This selection applies globally across the entire system.
 On every page, you will find the Company Selection Dropdown at the top-right corner of the header,
just to the left of the profile menu.
The dropdown displays a list of all companies that you have access to.
Important: All pages in the system will show data only for the selected company.
Data from other companies will not be visible until you switch the company.
You can easily switch companies by clicking the dropdown and selecting another company from the list.
On every page, you will find the Company Selection Dropdown at the top-right corner of the header,
just to the left of the profile menu.
The dropdown displays a list of all companies that you have access to.
Important: All pages in the system will show data only for the selected company.
Data from other companies will not be visible until you switch the company.
You can easily switch companies by clicking the dropdown and selecting another company from the list.
This section highlights assets that require immediate attention and provides a detailed overview of key dashboard statistics related to asset expiry, activity status, and company-level data.
Expired Asset Today – Displays all assets that expire on the current date.
These assets require immediate action to avoid compliance risks or service disruption.
Expired This Week – Shows assets scheduled to expire within the current week,
allowing you to plan renewals or actions in advance.
Active Assets – Represents assets that are currently valid and active,
meaning their expiry dates are still in the future.
Already Expired – Lists assets that have already crossed their expiry date
and may pose compliance or operational risks.
Total Asset – Shows the total number of assets available under the
currently selected company.
Total Seller – Displays the total number of sellers linked to the selected company.
Total Company – Indicates the total number of companies accessible
to the logged-in user based on permissions.
The Upcoming Reminder section helps you stay informed about assets that are approaching their expiry date. This ensures you receive timely notifications and can take action before assets expire.
Scheduled Reminders – Displays reminders that are scheduled for
upcoming asset expirations based on predefined reminder settings.
Reminder Date – Shows the exact date when the reminder will be
triggered before the asset expires.
Advance Notification – Helps users receive alerts in advance,
allowing sufficient time for renewal or necessary actions.
Configurable Alerts – Reminder timing can be configured
(e.g., days or weeks before expiry) based on business requirements.
The Expired Reminder section shows reminders for assets whose reminder time has already passed but no action was taken. This helps you identify missed alerts and take corrective steps immediately.
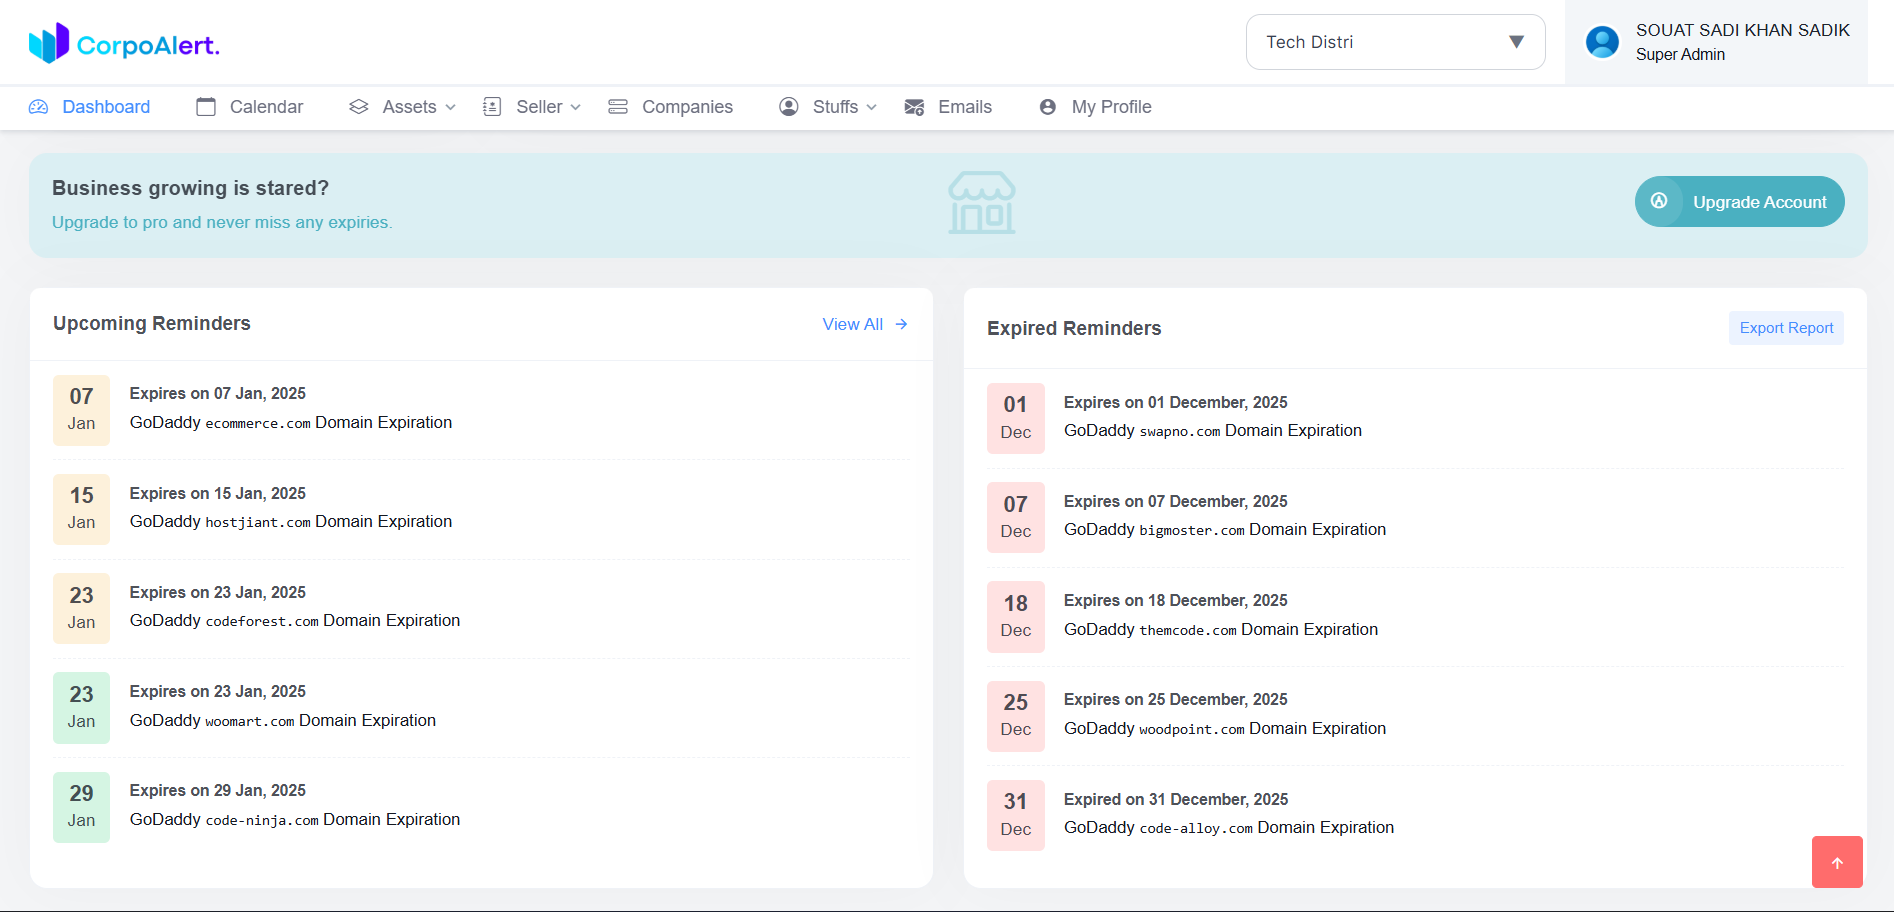 Expired Notifications – Displays reminders that have already passed
without any action being taken by the user.
Missed Reminder Date – Shows the date on which the reminder was supposed
to notify the user before asset expiration.
Risk Indicator – Helps identify assets that may already be expired
or are very close to expiry due to missed reminders.
Immediate Action Required – Encourages users to take quick action
such as renewal, replacement, or deactivation of the affected assets.
Expired Notifications – Displays reminders that have already passed
without any action being taken by the user.
Missed Reminder Date – Shows the date on which the reminder was supposed
to notify the user before asset expiration.
Risk Indicator – Helps identify assets that may already be expired
or are very close to expiry due to missed reminders.
Immediate Action Required – Encourages users to take quick action
such as renewal, replacement, or deactivation of the affected assets.
The My Profile section allows you to manage your personal account information and track your activity within the system.
My Profile – View your basic account information such as name,
email address, and profile details.
My Activities – Track your recent actions and activities
performed within the system.
My Documents – Access documents uploaded or associated
with your user account.
Edit Profile – Update your personal information such as
name, profile photo, or contact details.
Update Password – Change your account password to keep
your account secure.
The Profile Information section allows you to view and manage your personal account details, subscription plans, and activity-related information in one place.
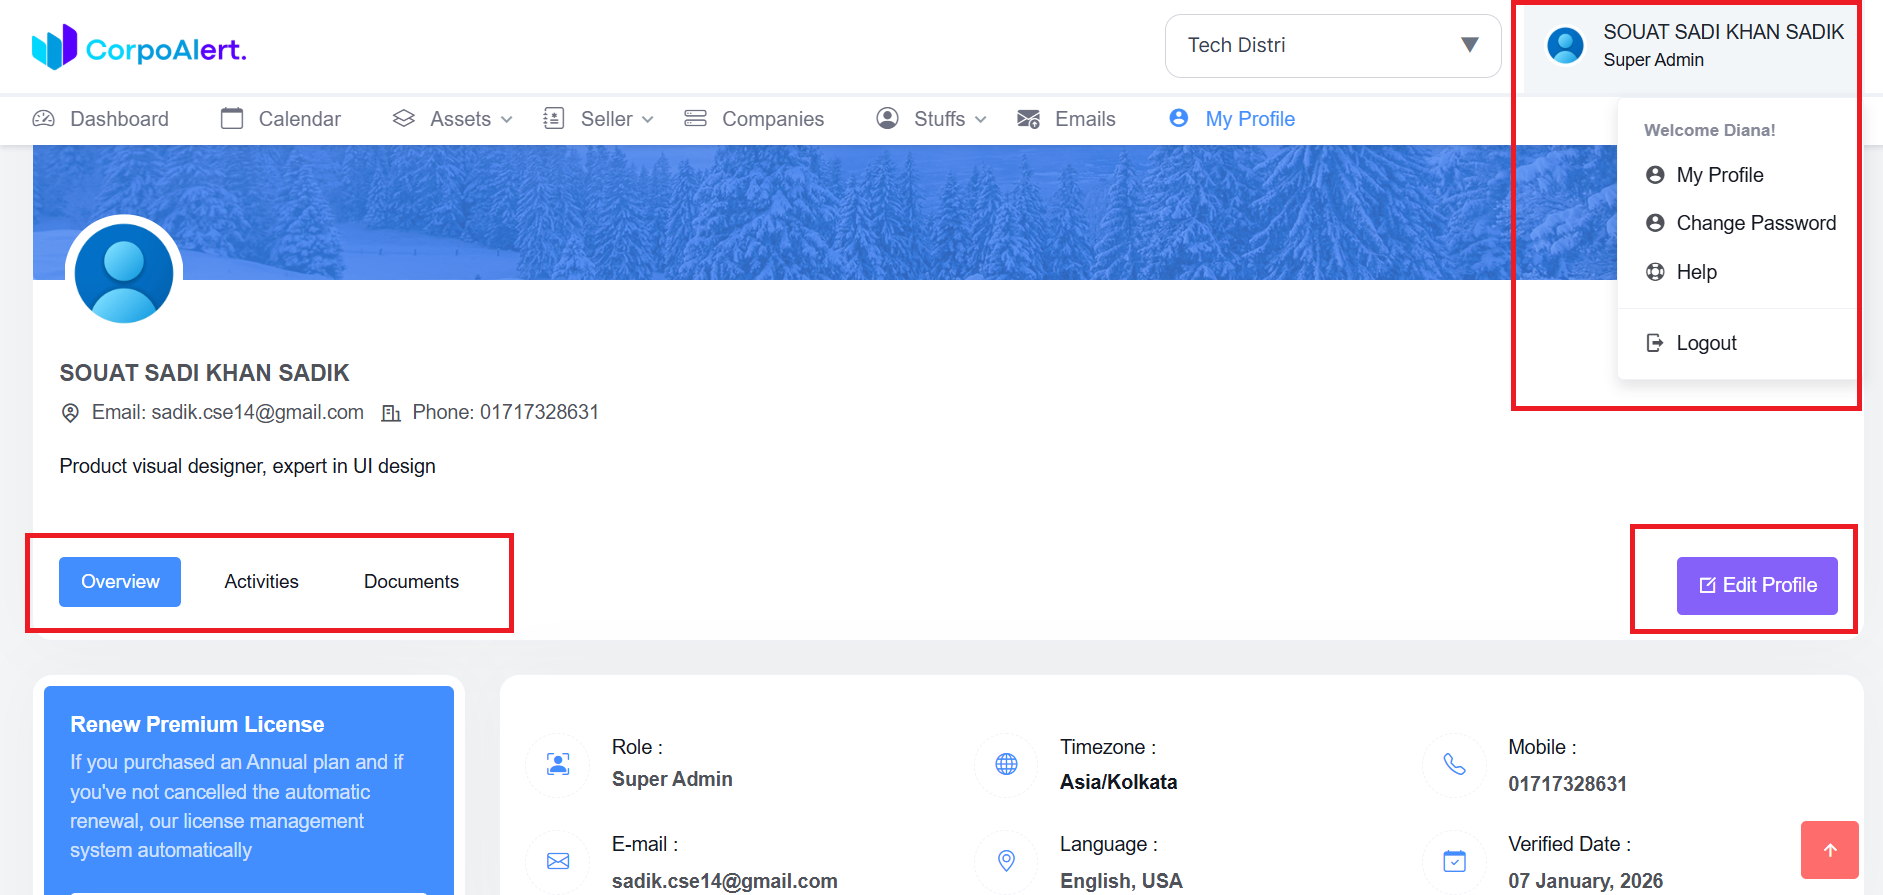
To access this page, navigate to the top-right corner of the header and click on your profile dropdown. From there, select the My Profile option.
Inside this page, you will find multiple tabs that help you manage different aspects of your account and profile.
General Overview – View your basic personal information such as name,
email address, account status, and current subscription plan.
My Activity – Review your recent actions and system activities
for better tracking and accountability.
My Documents – Access and manage documents linked to your user account.
Edit Profile – Update your personal details and profile information.
Other Profile Tabs – Additional tabs may appear based on your role
and system permissions.
The My Activities section allows you to track all actions performed within the system. It provides a clear record of activities for accountability and monitoring purposes.
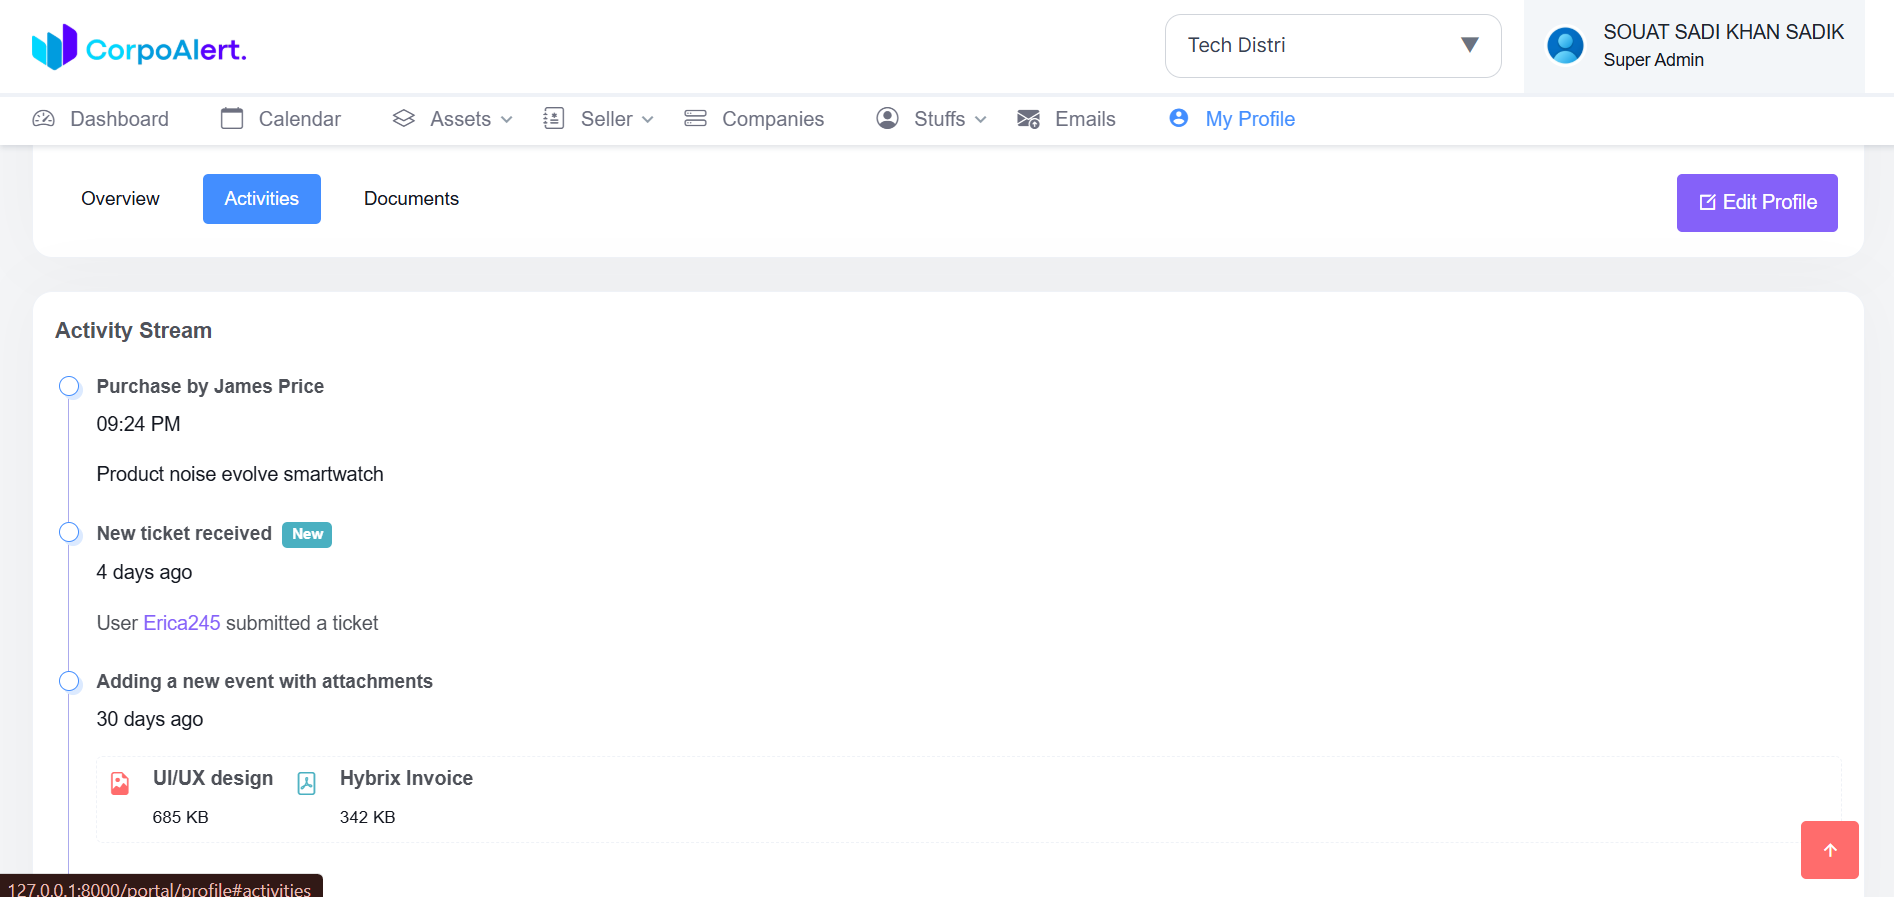 Super Admin / Owner View: If you have super admin or owner privileges,
you can view activities performed by all users across the system.
Normal User View: If you are a standard user, you can only view your own
activities. This ensures privacy and security of other users' data.
Activity Details: Each entry typically includes the type of action,
the time and date it occurred, and the user responsible (if applicable).
Filters: You can filter activities based on date ranges, action types,
or specific users (if permitted).
Super Admin / Owner View: If you have super admin or owner privileges,
you can view activities performed by all users across the system.
Normal User View: If you are a standard user, you can only view your own
activities. This ensures privacy and security of other users' data.
Activity Details: Each entry typically includes the type of action,
the time and date it occurred, and the user responsible (if applicable).
Filters: You can filter activities based on date ranges, action types,
or specific users (if permitted).
The My Documents section provides access to all your uploaded documents and asset files. Depending on your role, you can view, manage, and perform actions on these files.
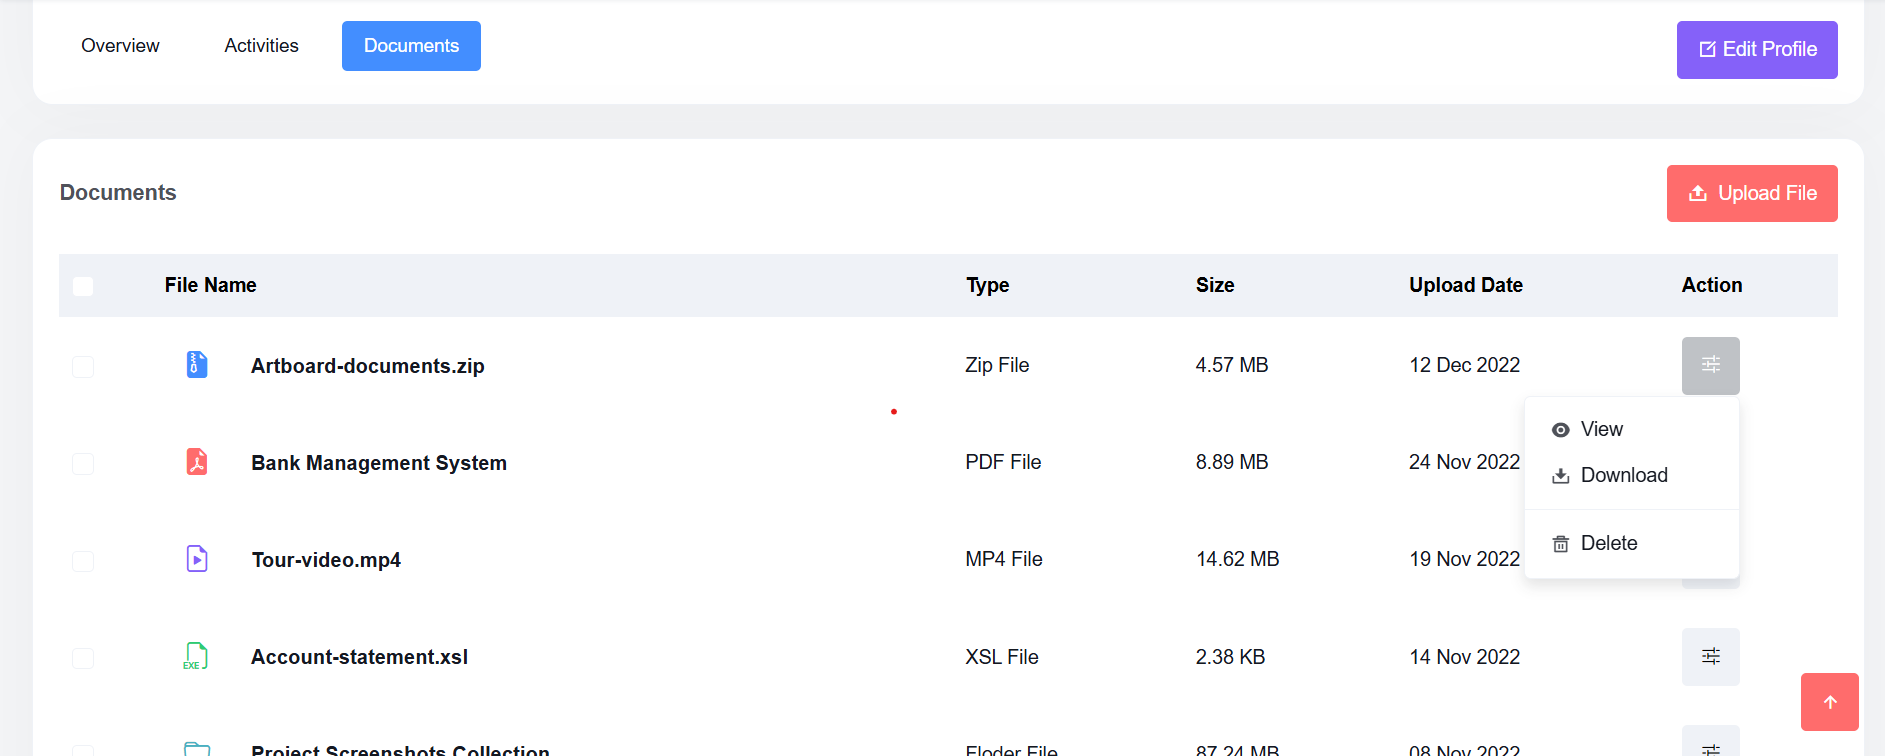 Super Admin / Owner View: Users with super admin or owner privileges can view
all documents and asset files uploaded by any user across the system.
Normal User View: Standard users can only view documents they uploaded or that are
shared with them, ensuring data privacy.
Action Buttons: Each file comes with a set of actions located on the right side,
including:
Super Admin / Owner View: Users with super admin or owner privileges can view
all documents and asset files uploaded by any user across the system.
Normal User View: Standard users can only view documents they uploaded or that are
shared with them, ensuring data privacy.
Action Buttons: Each file comes with a set of actions located on the right side,
including:
The Edit Profile section allows users to update their personal information and preferences. Access this form by clicking the Update Profile button on the My Profile page.
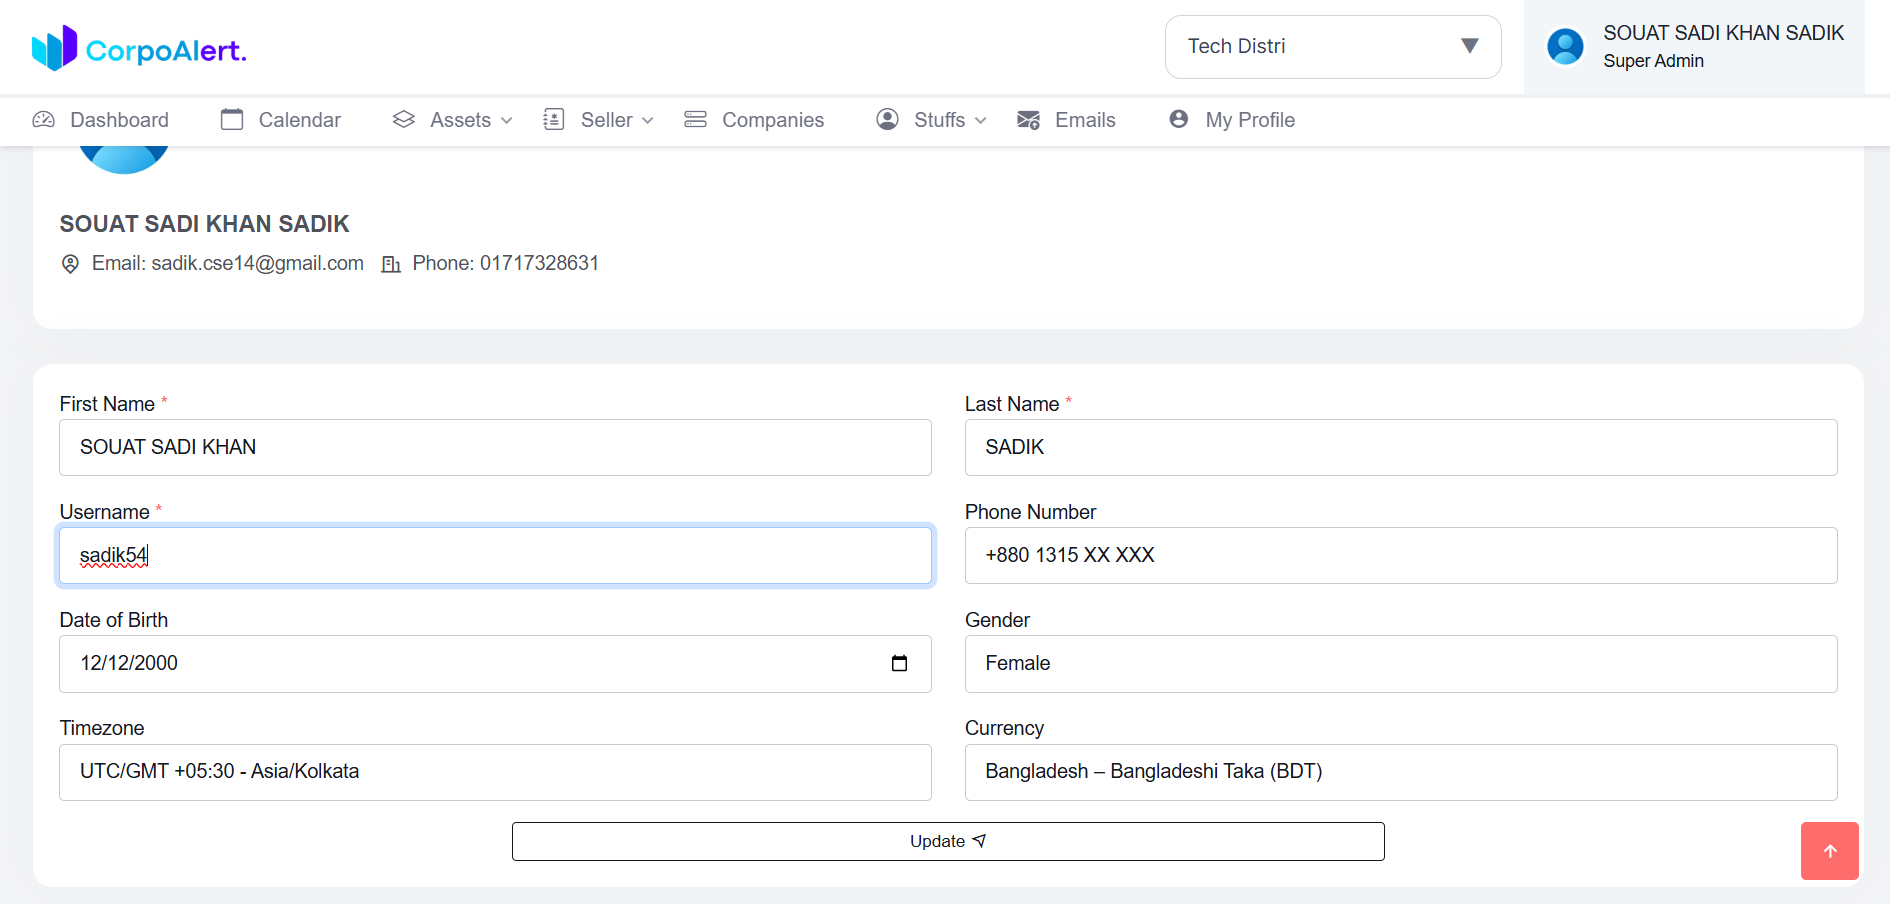 First Name: Required field, must be 3-100 characters.
Last Name: Required field, must be 3-50 characters.
Username: Required, 5-50 characters, must be unique.
Phone Number: Optional, must be a valid phone number format.
Date of Birth: Optional, format: Month, Day, Year (M, D, Y).
Gender: Required, select one from Male, Female, Other.
Timezone: Required, defaults to your current timezone but can be changed.
All displayed data will follow the selected timezone.
Currency: Required, defaults to your country’s currency but can be updated.
All displayed data will follow the selected currency.
First Name: Required field, must be 3-100 characters.
Last Name: Required field, must be 3-50 characters.
Username: Required, 5-50 characters, must be unique.
Phone Number: Optional, must be a valid phone number format.
Date of Birth: Optional, format: Month, Day, Year (M, D, Y).
Gender: Required, select one from Male, Female, Other.
Timezone: Required, defaults to your current timezone but can be changed.
All displayed data will follow the selected timezone.
Currency: Required, defaults to your country’s currency but can be updated.
All displayed data will follow the selected currency.
After filling in the form, click the Update button. The system will validate your input:
The Update Password section allows users to securely change their portal password. Access this form by going to My Profile → Change Password link in the top-right profile dropdown.
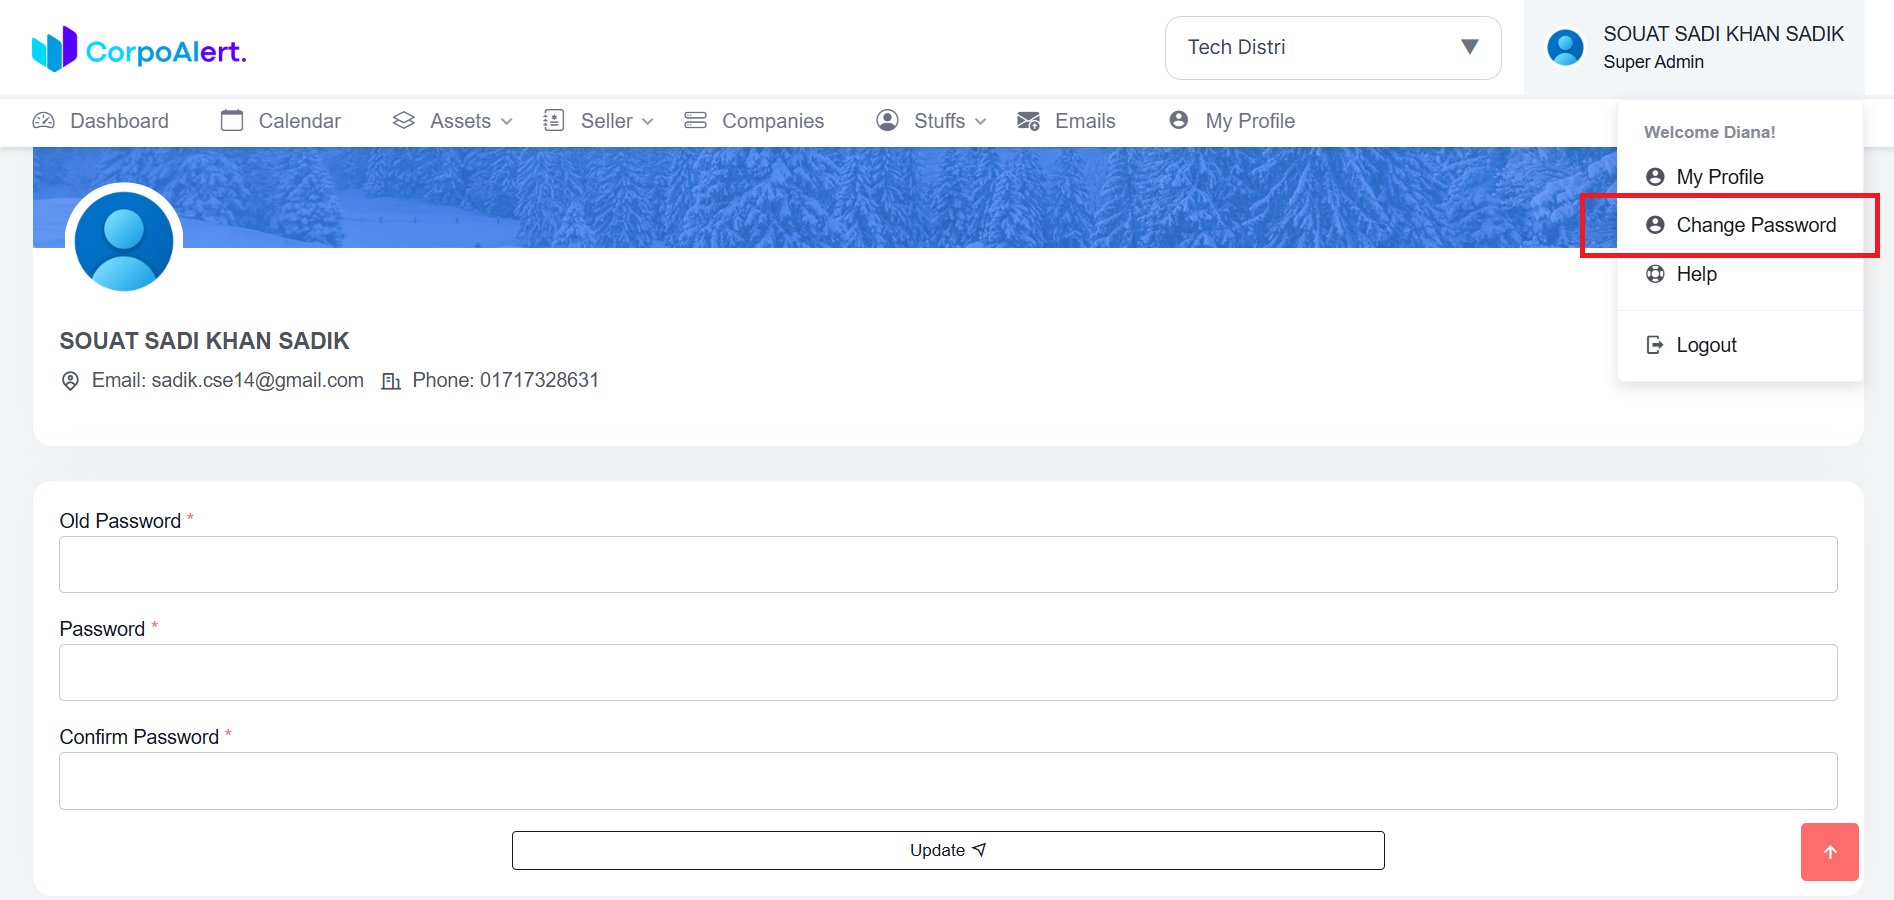 Current Password: Enter your existing password. The system will verify it before allowing changes.
New Password: Enter your desired password. Must follow rules:
Retype Password: Re-enter your new password to confirm it matches.
Current Password: Enter your existing password. The system will verify it before allowing changes.
New Password: Enter your desired password. Must follow rules:
Retype Password: Re-enter your new password to confirm it matches.
After filling in all fields, click Update. The system will validate:
This module allows you to manage email settings for the portal. You can add, update, delete, and test SMTP configurations to ensure emails are sent correctly from the system.
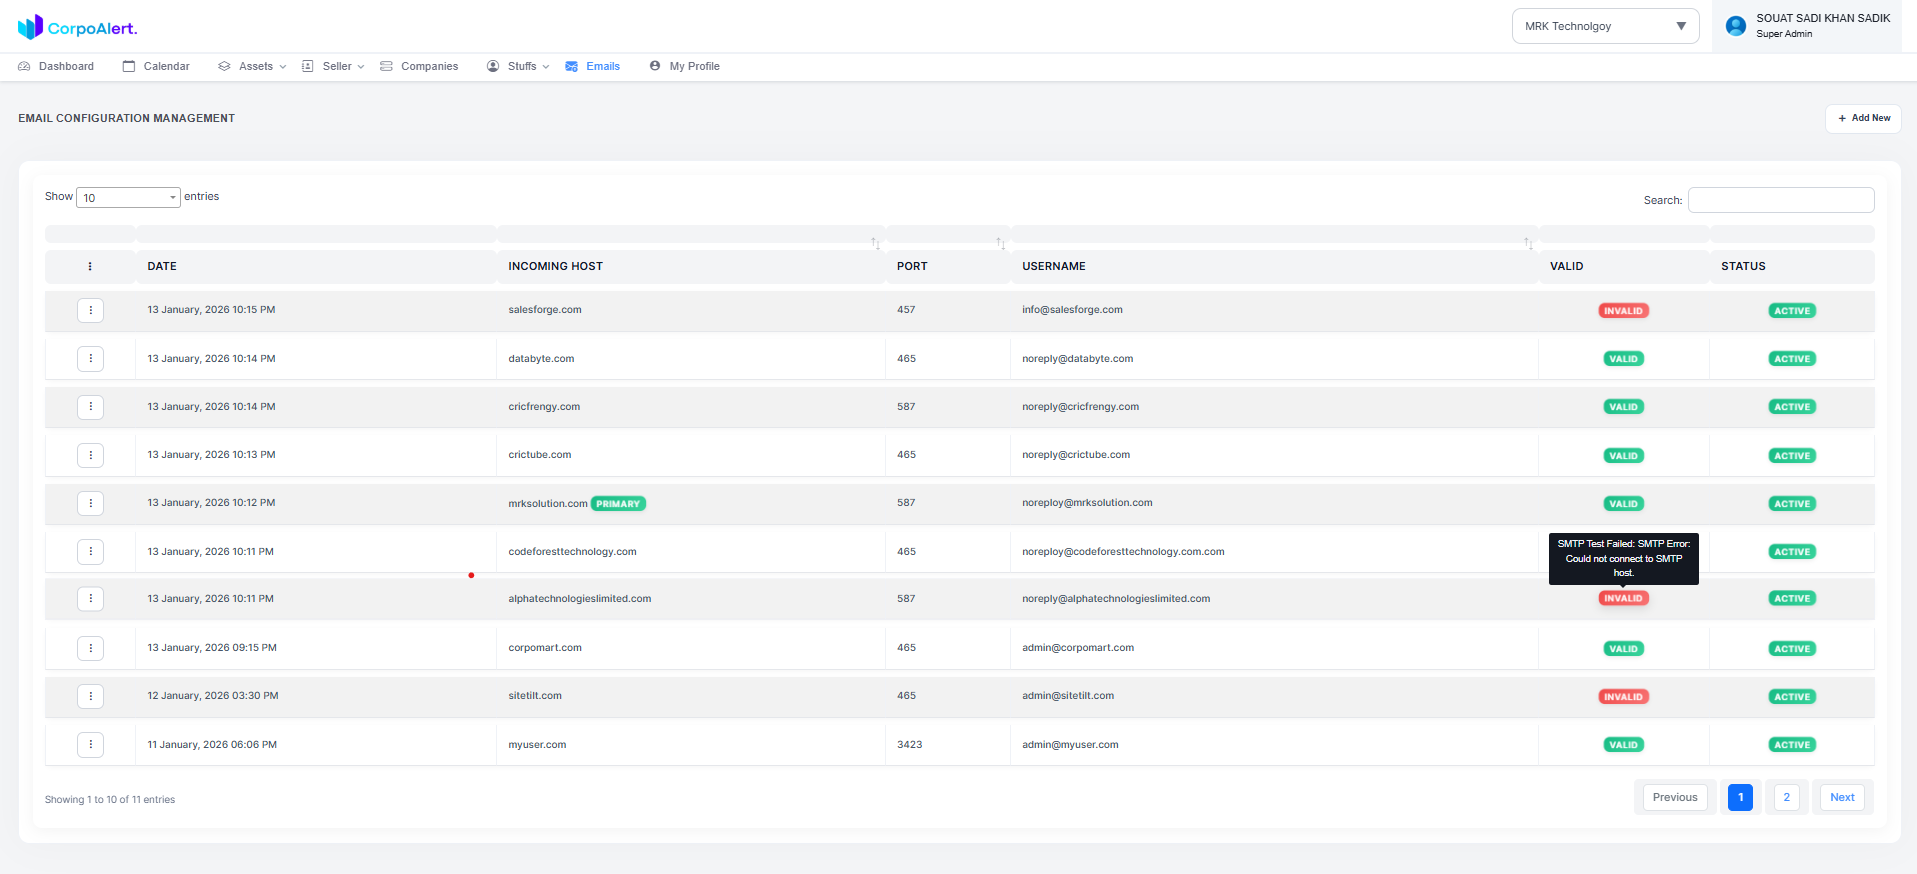 Add New SMTP – Click the + Add New button at the top-right corner of the page to create a new SMTP configuration.
Update SMTP Information – Click the action dropdown on any record to modify the existing SMTP settings as needed.
Delete SMTP Record – Use the action dropdown to remove SMTP configurations that are no longer required.
Test SMTP – Verify that SMTP settings are correctly configured by sending a test email from the system.
Valid Column – Each SMTP record will have a Valid status:
Valid if the SMTP works correctly, Invalid if there is an issue.
Hover over the Invalid badge to see detailed error information in a tooltip.
Add New SMTP – Click the + Add New button at the top-right corner of the page to create a new SMTP configuration.
Update SMTP Information – Click the action dropdown on any record to modify the existing SMTP settings as needed.
Delete SMTP Record – Use the action dropdown to remove SMTP configurations that are no longer required.
Test SMTP – Verify that SMTP settings are correctly configured by sending a test email from the system.
Valid Column – Each SMTP record will have a Valid status:
Valid if the SMTP works correctly, Invalid if there is an issue.
Hover over the Invalid badge to see detailed error information in a tooltip.
To send emails from your portal, you need valid SMTP credentials. You can get these credentials from your cPanel hosting account:
To add a new SMTP configuration, navigate to the Email Configuration module from the header menu. Once on the Email Configuration Management page, click the + Add New button at the top-right corner. This will open a sidebar form on the right side.
Incoming Host: Enter the mail server hostname (required, valid domain format, max 255 characters).
Port: Enter the server port number (required, numeric, 1-65535).
Username: Enter the SMTP username/email (required, valid email format, max 100 characters).
Password: Enter the SMTP password (required, min 8 characters, max 50 characters).
Encryption: Select the encryption method (required, options: SSL or TLS).
Primary Email: Toggle whether this SMTP should be the primary sending account (required, checkbox).
Status: Toggle the status of the SMTP configuration (required, active/inactive).
Once all fields are filled correctly, click the Create button. The system will:
This section allows you to update an existing SMTP configuration in the Email Configuration Module. You can modify details like server, port, username, password, encryption, primary email status, and active status.
Select the SMTP configuration you want to update from the list and click the Action → Edit option.
Update Incoming Host – Change the mail server hostname if needed.
Update Port – Typically 465 for SSL or 587 for TLS encryption.
Update Username – The full email address used for sending emails.
Update Password – Ensure it meets your security requirements.
Update Encryption – SSL or TLS depending on your server settings.
Set or update Primary Email – Only one email can be primary at a time.
Update Status – Enable or disable the SMTP configuration.
After updating, the system will validate the credentials. If valid, it will save the configuration;
otherwise, a toast message will display the error.
This section allows you to permanently remove an existing SMTP configuration from the Email Configuration Module. Use this option only if the SMTP account is no longer required or has been replaced.
Locate the SMTP configuration you want to remove from the list and click Action → Delete.
Confirm the deletion in the popup dialog. This action is irreversible, so ensure you are deleting the correct record.
Once confirmed, the system will remove the SMTP configuration from the database.
A toast message will notify you about the successful deletion or any error if it occurs.
This section allows you to verify whether an SMTP configuration is correctly set up and can send emails successfully. Testing ensures that emails sent from the system using this SMTP account will reach the recipients without errors.
Locate the SMTP configuration you want to test from the Email Configuration list.
Click on Action → Test. The system will attempt to send a test email using the selected SMTP account.
After testing, a toast notification will inform you whether the SMTP configuration is Valid or Invalid.
If the status shows Invalid, hover over the status to view detailed error information via tooltip.
Now that you've seen how it works, set it up on your own account. No credit card required, cancel anytime.